My GS was with me most of the Easter weekend and brought with him an Eyewitness book about the Ancient Egyptians. I already had a huge reference store having covered the subject as one of the history modules when I was teaching and I also had numerous encyclopaedias and reference books on the subject and I had downloaded a lot of info and images from the web so I didn't think I would see anything different but I have.There were lots of images I hadn't seen before and it set me off with lots more ideas and designs. The project is going to rival the Craster one.
Even though I said I wouldn't make any more jewellery after the 200 pieces I did for the book - I have succumbed and designed numerous pieces based on Ancient Egyptian jewellery and designs. They may come in handy if I need to produce a second book although I would rather cover a different theme.

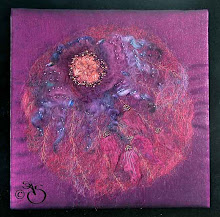
The piece I was part way through from the last blog is now finished. I used some silver mesh and silver beads and stitched them over the unstitched areas of silk fibres even under where the text was to go. These pieces of silver mesh also couched down some purple dyed yarn.
The text was placed over the top and remained in the centre. The silver beads held the text away from the background and could still be seen through the voile marche. (I have just ordered some more of this fabulous fabric ,mainly white, so that I can dye my own.) The piece was, as with all the others, satin stitched to pelmet vilene for support.
In answer to the request about using the soldering iron on the background - sheer fabric can be burned back using a heat gun but I wanted to be more accurate as to where I wanted the sheer to be removed so I used the soldering iron and roughly drew around the area I wanted to remove and pulled the sheer away. I have a soldering tip with a bend on it so if I tilt it slightly I can run a greater surface of heat over the sheer - difficult to explain but I hope you get the drift.

Having completed this piece I set to on the first of the jewellery pieces. In the book was a picture of a beautiful embossed and beaten silver dish. I used this design to create a feature necklace. I traced the design then transferred it to silver metal shim. Then I worked from both sides creating the embossing of the design. I added some silver beads as it was a piece of jewellery. It was backed with a pale grey thin felt to keep it light. I wanted to keep the pattern around the edges and putting it through the machine would have damaged the embossing so.... I hand stitched the edged with buttonhole stitch using flat silver thread. I went round twice to get a dense enough effect. It was attached to a stainless steal wire ring with a barrel fastener - courtesy of my very handy husband.

Here is a close up of the embossing.
I am now on with another one - after a cup of coffee....


4 comments:
What a beautiful necklace, Shirley, and the photo is brilliant, must have been a difficult subject.
Your WIP from the last post has worked out well too, you have been busy.
Glad all's well with your DH.
Thanks for visiting my blog and leaving a comment.
Fantastic embossing the pendant is lovely
Hi!
I just wanted to say THANK YOU for the wonderful information about Texere Yarn in Bradford. Today, I'm finally preparing to go to England. I leave tomorrow. I am definitely going to Bradford...likely on Wednesday...I think (almost totally confident that Wednesday is THE DAY!). I have to be back in Manchester for the ballet performance that evening! I'm so very, very excited about this! Thanks so much!
Susan
I think I know why most great artists are male, it is because the women are busy doing the cooking and cleaning. So stop now Pippa
Post a Comment