Sunday 29 June 2008

Finished 'Sheep in the snow' art quilt

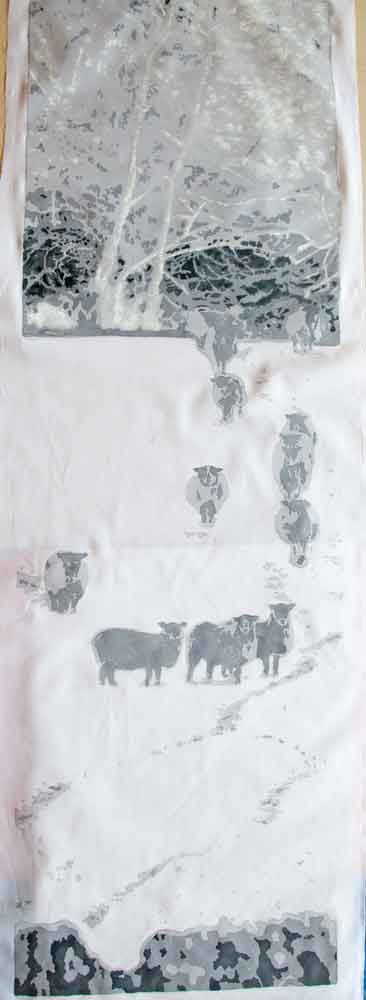
What a job finding somewhere to hang and photograph this quilt. Even with all the photography equipment we have it has been very difficult barring putting up a dark backdrop big enough. My walls are a (now) off white which didn't help. Anyway I have done the best I can and hope it gives a reasonably good impression of the finished piece.

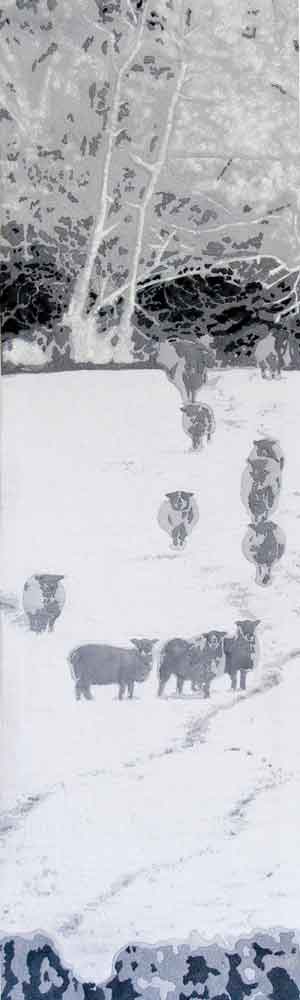
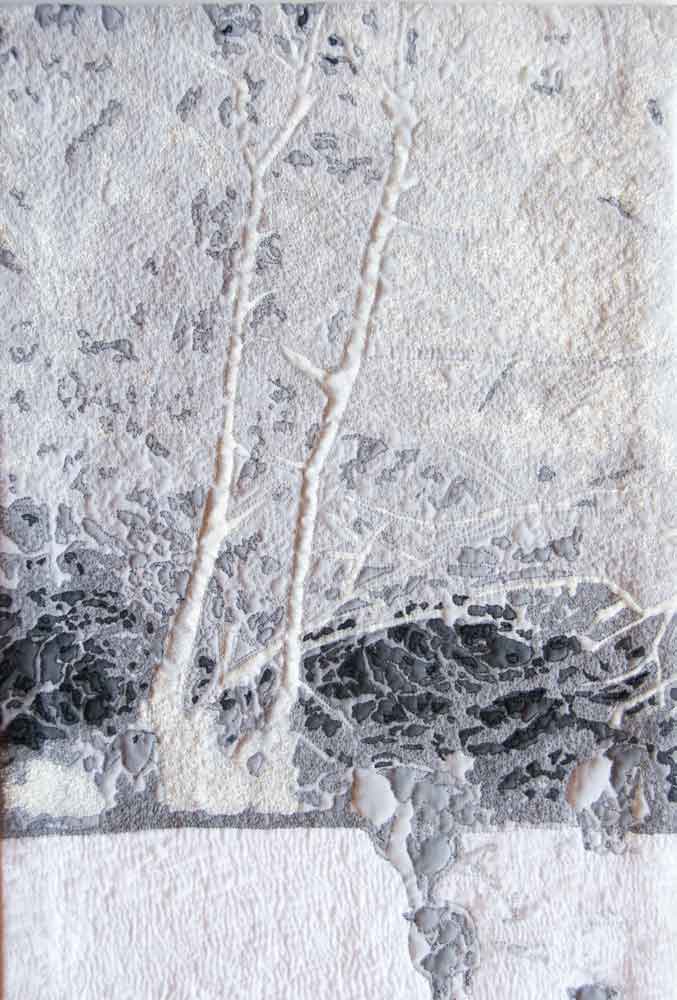
I really enjoy stitching these art quilts and I think I prefer - for me - painting and quilting as opposed to piecing fabrics. This has a few drawbacks as I have to test the paint colours all the time to see how they look on the fabric before putting it onto the actual piece fabric. I found that the white paint over the grey made it look yellowish rather than the white I was wanting. I used several different white paints but there was no difference - the grey had its effect under the white. When I created my thread paintings, the backgrounds were painted in such the same way, but much of that was machined over with little of the painted area left to see. With the quilting, a lot more of the painted area is still visible. I can see I will be learning more about paint and colours if I do more of these painted quilts although I think this particular subject in these colours wasn't the easiest to interpret - but I like challenges.

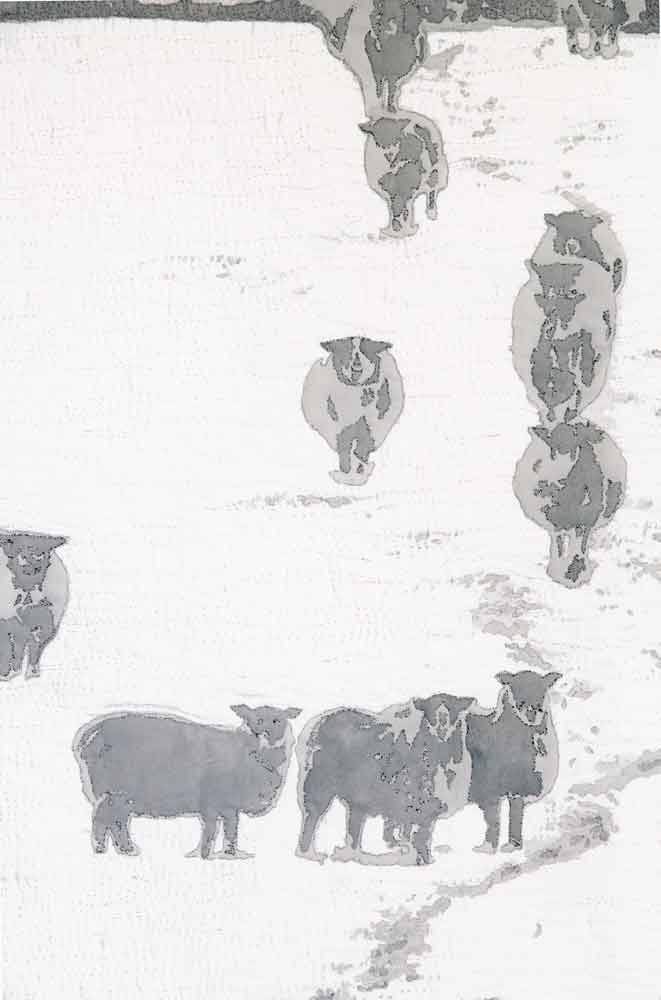
I did expect and found that they use a lot of thread. I now have to replace three of my greys which have run out. I used a mixture of metallics, rayon and polyester threads to help give more depth and highlights. I kept the sheep very stylised and from a distance- which is the best way to view the quilt - they work well.

The most densely stitched area is the top third which is the woods and trees at the back. I used my favoured vermicelli stitch (some call it stipple stitch) to fill between the outlined features.

The foreground area was less densely stitched.

I have to admire those quilters who create large quilts. They are not easy to handle and stitch using a normal machine although I expect those who make quilts to sell use more specialised machines and beds. I won't be doing that as I like to do so many different techniques and mediums - art quilts being only one of them. I have done lots of quilting within much of my other work but this is the first large art quilt.

Look forward to doing more of them.

Cheers everyone.

Sunday 22 June 2008

Starting a new piece - at last!

The Egyptian project is behind me now - at least until the first talk booked for later in the year.

I have begun a new piece. Hurray. Nice to have a different subject to concentrate on.

It is, however, a bit unseasonal, although the weather over the last couple of days could challenge that. It has been dreadful. Cold, wet and windy. No snow though and this piece has snow in it.

I took a series of photos in the snow last winter and created a digitally constructed image by combining two of them and then putting an effect onto the image with a filter in Photoshop giving a stylised image.

This is the image I created. I had it in mind to use it in some way for a textile piece but didn't know what technique I would use at the time. After completing the last quilted piece, I decided that an art quilt would be the best way to present this image as a textile piece.

I printed the image out by selecting smaller areas, printing them and then joining them together to give me an actual size print. This was traced onto a piece of white poly cotton. Once traced, I mixed fairly thin acrylic paints and painted the cotton. The photo isn't too good as I was standing precariously on a swivel chair to gain enough height to take the photo. I didn't have anywhere with enough light to pin it up. The colours are coming through from the surfaces underneath but you can see how it was looking if you squint??? It is meant to be viewed from a distance.

I made a sandwich with 2oz wadding/batting and white voile. It was ready to stitch. I matched the threads and decided to be a bit brave by using metallic threads for the sheep. Starting from the central area, i free machined the sheep and the track marks in the snow.

It is in the very early stages so don't judge it yet. There is a LOT of stitching to do. Will keep posting as I go.

Cheers for now.

Monday 16 June 2008

Finished piece

The art quilt is now finished.

The project is now complete and for the last couple of days the 69 pieces have been spread across my living room floor while I have been deciding how to mount and present many of the pieces. A couple of the panels have now been turned into books. I searched out some stored frames which have been in a cupboard for years. I did a bit of creative sponging and made them suitable - in fact very suitable - for a set of three Nefertiti profile pieces. I just have to stitch the spines of the two books and I can befgin to store the project away.

I have two talks booked for this project so I will be making a visual record which I show on a monitor while I talk about the pieces, techniques and materials.

We went out and did some gardening today while the weather was fine. In the side garden we found this clump of fungi. never seen this fungi there before.

I did a bit of macro on it.

A lovely copper colour.

Must get on with the stitching of the book spines now. I want to finish everything tomorrow and then SOMETHING NEW!!!

So cheers everyone.

Friday 13 June 2008

Quilt so far

Have been working on the quilt and in this image it shows the completed first stage of the stitching.

I only decided how the rest would be stitched when I reached this point and that too is finished now. I have just begun working on the border.

We had a lovely day at Reivaulx Abbey last week with one of the rare sunny windows. here's a few of the photos I took.

I took so many it took ages to process them all and we need to go back for a morning visit to catch the sun from the opposite direction.- - when we get another 'sunny window'??

So a short and sweet post today. Cheers.

Monday 9 June 2008

Art quilt preparation

I am in the process of creating an art quilt for my Egyptian project and it will be piece number 64.

I began with this image which is the profile of one of Nefertiti's stone busts.


I created a line drawing from it.


I created a pattern fill and using the bucket fill, filled the profile.
This was to be the working design. I needed to make a pattern A3 size. I did this in Photoshop. I put a new layer over the design and using the pencil tool drew all the lines of the design - making adjustments where the bands were too close together. The background layer was deleted leaving the lined pattern. This was then sized to A3 and printed.

Once I had the pattern I taped it down and laid a piece of white sateen over it - taping that down too - and using a soft pencil, carefully traced the design onto the fabric. The fabric was then stretched onto a frame ready for painting.

I matched up the colours with acrylic paints and silk dyes as best I could with the colours I had and mixed some too. I had to use clear gutta along the outer edges to prevent bleeding. (Remember to do this on the front and back to get a good seal. Unfortunately I did get a tiny bit of bleeding - this fabric isn't really good for silk painting but I wanted to use it. Hope I can mask it.). I painted the acrylic bands first as they acted as a resist for the silk paints. I made lots of serendipity paper and silk while painting this piece. Nothing wasted.

The painted fabric was removed from the frame and pinned over batting and backing fabric ready to be quilted.

I have matched up the threads with the paint colours and will begin the stitching later tonight. It actually looks better than the photo shows. Always difficult photographing metallics and in a hurry!!

How much stitching will be decided as I go.

Will post the finished piece when it is finished.

Cheers everyone.

Sunday 8 June 2008

Absolutely amazed

Well I am amazed. For some reason I decided to check my Blogger site after being locked out and it is working again!!!!
Now I have the dilemma of deciding what to do.
I have opened an account with Wordpress and have been blogging there since I was locked out of Blogger. I couldn't even access the help center let alone posting, editing and opening comments on the dashboard. Eventually I gave up and transferred.
I am now wondering whether to copy and paste so there are two blogs running side by side for those bloggers who only search Blogger and who did not know I had changed.

Anyway , my other blog is www.shirleyannesherris.wordpress.com and there are several posts on there.
Cheers from a confused blogger

Just testing - I have copied my other blog for Saturday 7th June and pasted it here. It seems to work. So might do that from now on.

Spent most of today in the garden. Planted up the baskets and tubs. Tidied up the patio. GS chased the frogs back into the pond. All looking good ready for the nice weather to sit out there and enjoy it!!!!

Finished the mobile yesterday and it has turned out quite well.

I explained in an earlier post on my Blogger site how I created the composite of Nefertiti. I used this image to make this mobile. I began by printing a digital composite onto a sheet of overhead acetate film.

I sliced it up into 9 pieces (3 x 3), then edged each of these in three different ways - buttonhole, wrap and running stitch. Beads were added along two sides of each. Using a fine lilac metallic thread I created line patterns and criss cross lines of beads across the surfaces of each. Once the embellishment was complete they were attached together with a bead spacer, to form two columns and a single piece joining the two columns together at the bottom. The two columns were suspended from a fine metal rod and were free to spin independently.

It looks quite effective hanging in the window with the light shining through.

So, two out of three isn't so bad. Still thinking about a rescue for the other one. I want to tackle another piece I have in mind first. So BFN everyone. Will post the progress of it as it goes.