
I have, at last, forced myself to allocate some time to update my blog.
I have created so many pieces since my last blog that there are too many to post on this one but hopefully it will not be as long between this one and the next.
I am beginning with an art quilt which was created from a photograph taken from the Rialto bridge. It will be recognised as it a classic view. I took the image into the computer and applied a filter which gave me a stylised version. This was printed onto silk and then made up into a quilt sandwich and then free machined. I added some paint to highlight parts of the image.

The next piece uses this same image but this time I printed it onto clear acetate. I cut it up into rectangles. Each rectangle was then edged with buttonhole stitch and criss- crossed with thread and beads. They were then joined together to create a mobile. They were positioned so that each mini image could rotate and spin.

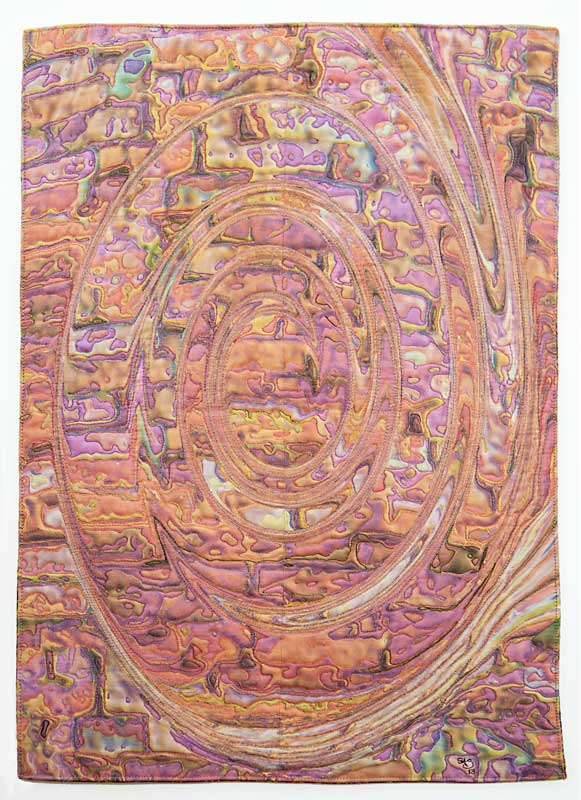
The next piece is another art quilt, but for this one, I have used an image of one of the walls in Venice, put it into Photoshop and applied several different filters and effects until I achieved one which I liked and could see interpreted into a textile piece. I wanted a large quilt so I had to print it in two halves. I printed it on white cotton. Once printed, I joined it together and made up the usual quilt sandwich. I matched the thread colours in the design and free machined the surface. When the stitching was complete, I highlighted different parts with metallic paints.
As usual, I have created many pieces using the text of the name Venice. I distorted the text to create a text design which was to be used many times. I cut this design from pelmet vilene numerous times. They were glued to another piece of pelmet vilene which was cut to be the cover for a book. This was then painted and highlighted with gilding wax. A small cut out of the text was used to make a book tag. I twisted some cords together and machine wrapped it then dyed and painted it to make a tie wrap for the book.

After this piece, I got a bit carried away with making bag tags using lots of different techniques. Rather than covering each one separately, I have grouped them together into one image. I think most of you will be able to work out the different techniques that I have used.

The next piece was inspired by the iconic metal heads of the Gondolas. Every gondola has one. I used a synthetic silver leather and cut out eight of these head designs. They were stuck onto painted pelmet vilene for the lid. The sides were made using a turquoise rayon velvet. I digitised the distorted text design and stitched it out onto some aqua green satin lining. These little panels were stitched onto the side panels of the box.
 ii
iiStaying with the theme of Venice text, I digitised machine patterns for each of the letters in the name Venice. I used another piece of the turquoise rayon velvet for the base fabric. This was covered with a sheer fabric. I couched down various textured yarns and ribbons etc using each of the machine patterns.The panel was hung from a rod made from a painted kebab stick. Some of the sheer was burned away revealing the velvet texture.

This time I used the text and the gondola head to create a panel. First I painted some canvas, then stamped the text and gondola heads using stamps I had made from funky foam. Four coloured pipe cleaners were couched down the colour changes of the background. I used the letter stamps to impress into air-dried clay which were then painted and hung from the pipe cleaners. I cut out and embossed metal shim gondola heads which were simply tucked under the pipe cleaners.

Using the gondola head as the design source again, I created a tassel. I cut eight gondola heads from the silver leather in pairs so that they could be stuck together back to back. The skirt was made with many different textured yarns and threads in blacks and silver. The four gondola heads were stitched into the tassel head.

I made another tassel using the text of Venice. I typed the word Venice into my embroidery machine to create a stitch pattern. this was stitched continuously around a spiral of jade felt. The spiral was cut and edged and beaded by hand. It was hung around the finished tassel constructed from various textured yarns and threads in blues and aquas.

The next piece was a technique I first used for my Craster project. I created a square in sheer fabrics for each letter of Venice. The letter designs on each of the squares were very stylised so they looked more like a pattern. The letters were machined and the edges of the squares were stitched with different machine patterns. The squares were joined together using beads.

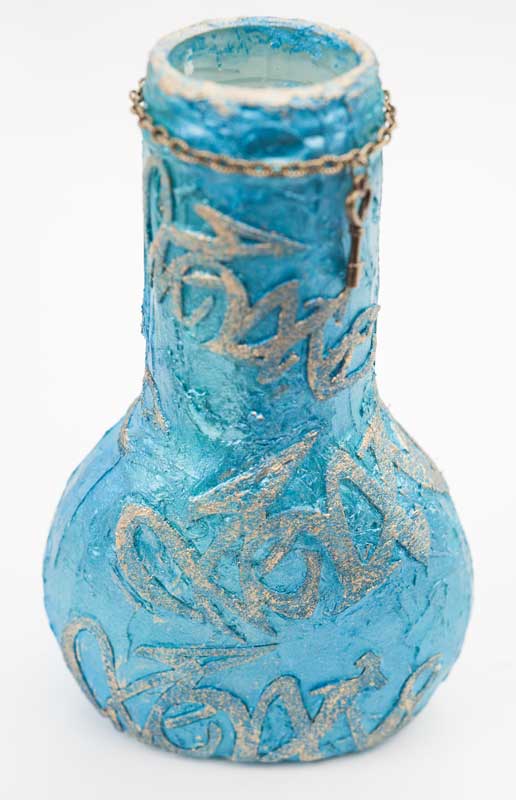
I can't take total credit for the next piece as it was devised after watching a video on You-tube. I found a small bottle which I had kept - I keep lots of things as I always think that one day they will be of use and it paid off. It was just what I needed. I covered the bottle with texture/molding paste. I cut out a number of distorted texts from a medium weight pelmet vilene and stuck them onto the dried paste surface wrapping them around the curves of the bottle. The bottle and text were painted and the text highlighted with gilding wax. A small chain and a key was hung from the neck.
.
And that is as far as I will go for this post. There are many more pieces but they will have to wait for the next post.
So until the next post, Cheers everyone.


