Sunday, 28 July 2013
Penultimate Venice project - I think!!
It has been a long, long time since my last post. It is that 'time fairy' again. Not enough hours in the day to do everything. So instead of all the reasons and 'excuses' for the delay, I will get straight on with posting more of the Venice project pieces.
The first of the pieces is a set of jewellery. The source for the design came from Venetian glass. I used glass gems and enclosed them in fine metal thread tubing separating them with small silver beads.
The next series of pieces came from digital manipulation of some of the images creating patterns and colours far removed from the original image. The patterns were printed onto printer transfer paper. I created bookmarks, bag tags, booklets and folders. The first image is of a set of bookmarks. The printed transfer paper was ironed onto pelmet vilene which had been colour washed first using a matching colour. The surfaces were enhanced with embossing powders and gilding pens.
The next image is of a bag tag. This time it was ironed onto black craft vilene.
This is a small booklet. The transfer paper was ironed onto coloured pelmet vilene. Parts of the pattern were highlighted with a gold pen. I stitched pale green pages inside and closed with some dyed viscose ribbon.
This is a small folder was machine stitched, picking out the main features of the design. This machine stitching also decorated the inside of the folder which had been coloured first. I also sponged the inside with lilac paint.
This next piece is very similar to the bookmark but this time I cut windows out, buttonhole stitched around the holes and then placed printed acetate images of Venice in the windows. I repeated this for the back which means that it can be viewed from both sides and hence became a hanging. Beads were added and tassels at the bottom.
I ironed the transfer paper onto black felt to create this bracelet. It was enhanced with glass gems, beads and stitching.
I made a stencils using some of the carved stones in the wall of the Basillica. I used these stencils to create a book cover. I had some fabric left over from dress making many years ago - and was just what I needed. It represented the waters of Venice. Using silver paint, I stencilled the designs onto the surface of the fabric. I made it into a quilt sandwich and machined around the designs. I added some gold paint to highlight part of one design.
I always use the text of the place of a project so I digitised a distorted text of Venice and stitched it out for the flap of a bag. It was stitched over some dyed fibres made into a fabric. It was then outlined with a gold twist.
Much of the paint work in Venice is old, faded, discoloured and peeling. I quite like old peeling paint doors and always photograph them. I loved the colours of this door and it had been the design source for a few pieces. This time it was the design source for a tile I created.
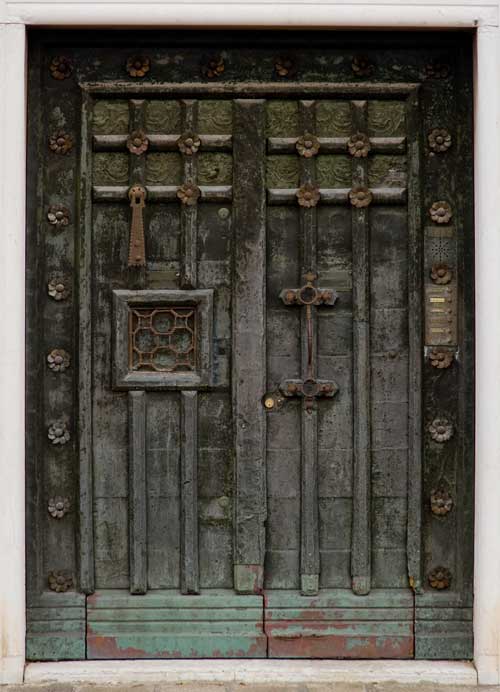
This is the door and the part that I used is the small square which I think is a mini door for checking who is knocking before opening. I had to create the different parts of this square. The raised frame was made from tissue and PVA over a strip of fancy edging wood. I had some green wire which I twisted into the pattern of the wire in the square. Not easy. I put them all together on a piece of stiff board. Painted it with black gesso and the used a green interference to achieve the green patina and then highlighted with silver metallic paint.
Finally, I printed an image from Venice onto Avalon which had been coated with InkAID first. I cut it into three panels and stitched them onto the flap of a denim fabric wich I made up into a bag.
I machined Venice along the handle.
So, that leaves just one more post to complete my Venice project.
Until then, cheers everyone.
Tuesday, 21 May 2013
Lots more Venice pieces
This has been a very long lapse so I must thank all those who are still checking in on my blog on a regular basis.
I have, at last, forced myself to allocate some time to update my blog.
I have created so many pieces since my last blog that there are too many to post on this one but hopefully it will not be as long between this one and the next.
I am beginning with an art quilt which was created from a photograph taken from the Rialto bridge. It will be recognised as it a classic view. I took the image into the computer and applied a filter which gave me a stylised version. This was printed onto silk and then made up into a quilt sandwich and then free machined. I added some paint to highlight parts of the image.

The next piece uses this same image but this time I printed it onto clear acetate. I cut it up into rectangles. Each rectangle was then edged with buttonhole stitch and criss- crossed with thread and beads. They were then joined together to create a mobile. They were positioned so that each mini image could rotate and spin.

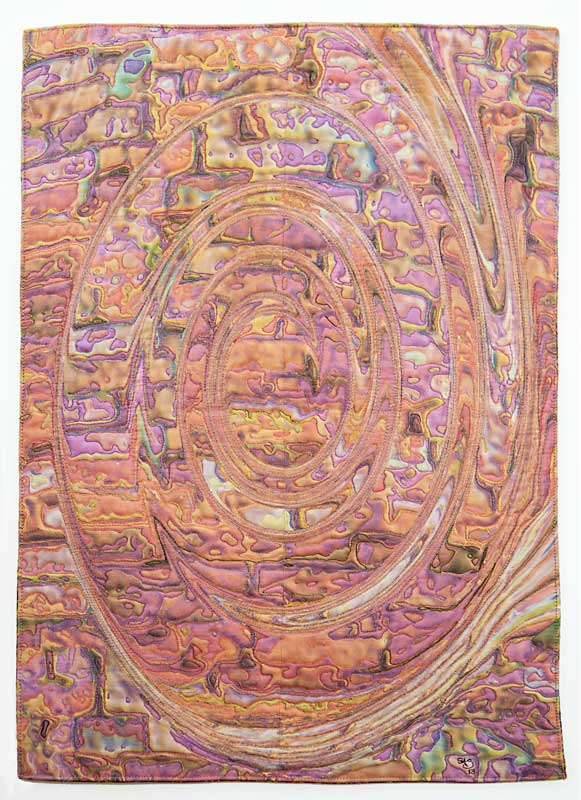
The next piece is another art quilt, but for this one, I have used an image of one of the walls in Venice, put it into Photoshop and applied several different filters and effects until I achieved one which I liked and could see interpreted into a textile piece. I wanted a large quilt so I had to print it in two halves. I printed it on white cotton. Once printed, I joined it together and made up the usual quilt sandwich. I matched the thread colours in the design and free machined the surface. When the stitching was complete, I highlighted different parts with metallic paints.

As usual, I have created many pieces using the text of the name Venice. I distorted the text to create a text design which was to be used many times. I cut this design from pelmet vilene numerous times. They were glued to another piece of pelmet vilene which was cut to be the cover for a book. This was then painted and highlighted with gilding wax. A small cut out of the text was used to make a book tag. I twisted some cords together and machine wrapped it then dyed and painted it to make a tie wrap for the book.

After this piece, I got a bit carried away with making bag tags using lots of different techniques. Rather than covering each one separately, I have grouped them together into one image. I think most of you will be able to work out the different techniques that I have used.

The next piece was inspired by the iconic metal heads of the Gondolas. Every gondola has one. I used a synthetic silver leather and cut out eight of these head designs. They were stuck onto painted pelmet vilene for the lid. The sides were made using a turquoise rayon velvet. I digitised the distorted text design and stitched it out onto some aqua green satin lining. These little panels were stitched onto the side panels of the box.
ii
Staying with the theme of Venice text, I digitised machine patterns for each of the letters in the name Venice. I used another piece of the turquoise rayon velvet for the base fabric. This was covered with a sheer fabric. I couched down various textured yarns and ribbons etc using each of the machine patterns.The panel was hung from a rod made from a painted kebab stick. Some of the sheer was burned away revealing the velvet texture.

This time I used the text and the gondola head to create a panel. First I painted some canvas, then stamped the text and gondola heads using stamps I had made from funky foam. Four coloured pipe cleaners were couched down the colour changes of the background. I used the letter stamps to impress into air-dried clay which were then painted and hung from the pipe cleaners. I cut out and embossed metal shim gondola heads which were simply tucked under the pipe cleaners.

Using the gondola head as the design source again, I created a tassel. I cut eight gondola heads from the silver leather in pairs so that they could be stuck together back to back. The skirt was made with many different textured yarns and threads in blacks and silver. The four gondola heads were stitched into the tassel head.

I made another tassel using the text of Venice. I typed the word Venice into my embroidery machine to create a stitch pattern. this was stitched continuously around a spiral of jade felt. The spiral was cut and edged and beaded by hand. It was hung around the finished tassel constructed from various textured yarns and threads in blues and aquas.

The next piece was a technique I first used for my Craster project. I created a square in sheer fabrics for each letter of Venice. The letter designs on each of the squares were very stylised so they looked more like a pattern. The letters were machined and the edges of the squares were stitched with different machine patterns. The squares were joined together using beads.

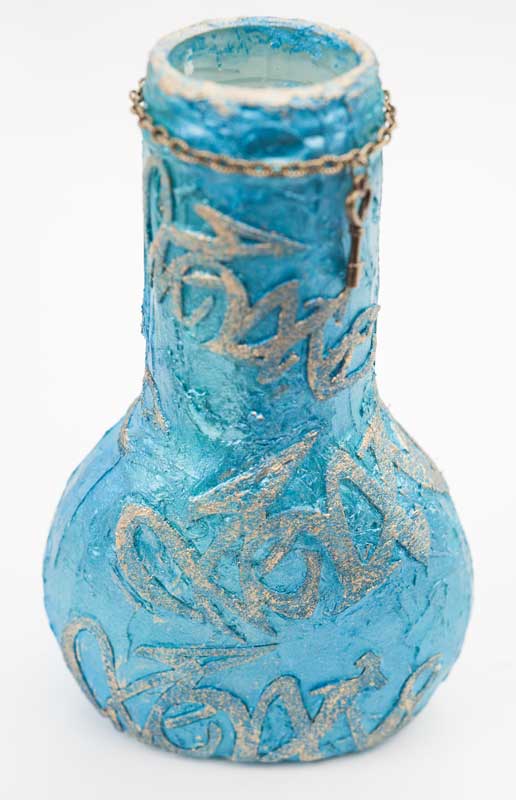
I can't take total credit for the next piece as it was devised after watching a video on You-tube. I found a small bottle which I had kept - I keep lots of things as I always think that one day they will be of use and it paid off. It was just what I needed. I covered the bottle with texture/molding paste. I cut out a number of distorted texts from a medium weight pelmet vilene and stuck them onto the dried paste surface wrapping them around the curves of the bottle. The bottle and text were painted and the text highlighted with gilding wax. A small chain and a key was hung from the neck.
.
And that is as far as I will go for this post. There are many more pieces but they will have to wait for the next post.
So until the next post, Cheers everyone.
I have, at last, forced myself to allocate some time to update my blog.
I have created so many pieces since my last blog that there are too many to post on this one but hopefully it will not be as long between this one and the next.
I am beginning with an art quilt which was created from a photograph taken from the Rialto bridge. It will be recognised as it a classic view. I took the image into the computer and applied a filter which gave me a stylised version. This was printed onto silk and then made up into a quilt sandwich and then free machined. I added some paint to highlight parts of the image.

The next piece uses this same image but this time I printed it onto clear acetate. I cut it up into rectangles. Each rectangle was then edged with buttonhole stitch and criss- crossed with thread and beads. They were then joined together to create a mobile. They were positioned so that each mini image could rotate and spin.

The next piece is another art quilt, but for this one, I have used an image of one of the walls in Venice, put it into Photoshop and applied several different filters and effects until I achieved one which I liked and could see interpreted into a textile piece. I wanted a large quilt so I had to print it in two halves. I printed it on white cotton. Once printed, I joined it together and made up the usual quilt sandwich. I matched the thread colours in the design and free machined the surface. When the stitching was complete, I highlighted different parts with metallic paints.

As usual, I have created many pieces using the text of the name Venice. I distorted the text to create a text design which was to be used many times. I cut this design from pelmet vilene numerous times. They were glued to another piece of pelmet vilene which was cut to be the cover for a book. This was then painted and highlighted with gilding wax. A small cut out of the text was used to make a book tag. I twisted some cords together and machine wrapped it then dyed and painted it to make a tie wrap for the book.

After this piece, I got a bit carried away with making bag tags using lots of different techniques. Rather than covering each one separately, I have grouped them together into one image. I think most of you will be able to work out the different techniques that I have used.

The next piece was inspired by the iconic metal heads of the Gondolas. Every gondola has one. I used a synthetic silver leather and cut out eight of these head designs. They were stuck onto painted pelmet vilene for the lid. The sides were made using a turquoise rayon velvet. I digitised the distorted text design and stitched it out onto some aqua green satin lining. These little panels were stitched onto the side panels of the box.
iiStaying with the theme of Venice text, I digitised machine patterns for each of the letters in the name Venice. I used another piece of the turquoise rayon velvet for the base fabric. This was covered with a sheer fabric. I couched down various textured yarns and ribbons etc using each of the machine patterns.The panel was hung from a rod made from a painted kebab stick. Some of the sheer was burned away revealing the velvet texture.

This time I used the text and the gondola head to create a panel. First I painted some canvas, then stamped the text and gondola heads using stamps I had made from funky foam. Four coloured pipe cleaners were couched down the colour changes of the background. I used the letter stamps to impress into air-dried clay which were then painted and hung from the pipe cleaners. I cut out and embossed metal shim gondola heads which were simply tucked under the pipe cleaners.

Using the gondola head as the design source again, I created a tassel. I cut eight gondola heads from the silver leather in pairs so that they could be stuck together back to back. The skirt was made with many different textured yarns and threads in blacks and silver. The four gondola heads were stitched into the tassel head.

I made another tassel using the text of Venice. I typed the word Venice into my embroidery machine to create a stitch pattern. this was stitched continuously around a spiral of jade felt. The spiral was cut and edged and beaded by hand. It was hung around the finished tassel constructed from various textured yarns and threads in blues and aquas.

The next piece was a technique I first used for my Craster project. I created a square in sheer fabrics for each letter of Venice. The letter designs on each of the squares were very stylised so they looked more like a pattern. The letters were machined and the edges of the squares were stitched with different machine patterns. The squares were joined together using beads.

I can't take total credit for the next piece as it was devised after watching a video on You-tube. I found a small bottle which I had kept - I keep lots of things as I always think that one day they will be of use and it paid off. It was just what I needed. I covered the bottle with texture/molding paste. I cut out a number of distorted texts from a medium weight pelmet vilene and stuck them onto the dried paste surface wrapping them around the curves of the bottle. The bottle and text were painted and the text highlighted with gilding wax. A small chain and a key was hung from the neck.
.

And that is as far as I will go for this post. There are many more pieces but they will have to wait for the next post.
So until the next post, Cheers everyone.
Saturday, 9 March 2013
Catch up with Venice project
Time to keep my Venice project up to date.
The first piece was inspired by a sculpture which was situated on the quay side where the water buses stop. It was a large metal grid ball filled with small blue plastic balls and a few other colours mixed in. At night it is lit by strong lights from the centre of the ball.

I interpreted this almost directly using blue sheer fabrics, creating an evening purse. I cut out small circles of sheers using a soldering iron . These were placed under the main layer of blue sheer. I created the metal ball effect by machine quilting. A silver chain was used as the handle and beads and embossed silver shim for bag tags.

Continuing with this ball sculpture, I put the image into Photoshop and applied a filter. In fact, I applied several filters which gave me numerous effects. I decided on three of the colour schemes. These were to become a triptych, printed on cotton and then painted and quilted and embellished with beads, sequins and couched decorative yarns. The first printout didn’t go exactly to plan so it became a bag.

The next three images show the panels of the triptych.


These will be mounted onto box frames covered with canvas and painted with white gesso.
When I was creating the black leather door pieces, I stitched out a small digitised version of the door design. I made this into a pendant.

I always like to use text in my project and depict the name of the place in some way. This mobile used the letters of Venice. They were digitised and stitched out onto satins. I did two for each letter which were then placed back to back, stitched together, edged and beaded. They were then strung together to create a hanging.

While I was stitching out the main header letter V, I hadn’t positioned it correctly or given it enough space around it. However, as I never discard anything, I rescued this and created a bag tag. I cut out the letter and stitched it onto painted pelmet vilene.

The next piece was created by printing an image of the Grand Canal from the Rialto bridge onto acrylic acetate – OH projector acetate. Once the image was printed it was laid over a sheer fabric and then over pelmet vilene. The sides of the box were made from free machined green satin.

Using the water of the canals and the reflections of the gondola heads in the water as the design source, I created a cuff.


The fasteners were beads, painted with metallic acrylic paint to match.
When I was creating pieces using the music mask as the design source, I had a couple of small embossed shim masks which were still unused. I decided to make one of them into a post card. Painted pelmet vilene was the base. I made some fibre fabric from dyed fibres and machined this onto the vilene using vermicelli stitch. I hand stitched the red embossed shim mask on top of this. I added beads to represent the sparkle of the water.

I used the second embossed shim mask to make the front cover of a note booklet. I used a music machine pattern to couch down the dyed fibre fabric.

The next piece for this post used the name of Venice again. I used each individual letter and layered them in Photoshop, overlapping them and distorting them until I had an abstract of the name. I digitised this and stitched it out onto dyed fibre fabric laid over a satin. It was then outlined with couched gold thread. The remaining area of the fibre fabric was stitched down using free machined vermicelli stitch and finally small beads were applied randomly over the surface.

The final piece used the same technique. This time the letters were placed in a line and distorted to create an abstract. It was digitised and machined the same as for the bag. This time I made the fibre fabric large enough to cover the front and back of a book. It was couched in place with rows of free machined wavy lines to create the ripples of the water in Venice. I used a spare piece of printed acetate showing a small scene on the Grand Canal to create a book tag.

This brings me up to date with finished pieces.
At the moment, I am free machine quilting two large art quilts. These will be the subject of the next post.
Today I was giving a talk about my Egyptian project and tomorrow I will be leading a dayschool teaching some of the techniques I used in the project. I hope they will enjoy it.
Until the next post. Cheers everyone.
The first piece was inspired by a sculpture which was situated on the quay side where the water buses stop. It was a large metal grid ball filled with small blue plastic balls and a few other colours mixed in. At night it is lit by strong lights from the centre of the ball.

I interpreted this almost directly using blue sheer fabrics, creating an evening purse. I cut out small circles of sheers using a soldering iron . These were placed under the main layer of blue sheer. I created the metal ball effect by machine quilting. A silver chain was used as the handle and beads and embossed silver shim for bag tags.

Continuing with this ball sculpture, I put the image into Photoshop and applied a filter. In fact, I applied several filters which gave me numerous effects. I decided on three of the colour schemes. These were to become a triptych, printed on cotton and then painted and quilted and embellished with beads, sequins and couched decorative yarns. The first printout didn’t go exactly to plan so it became a bag.

The next three images show the panels of the triptych.


These will be mounted onto box frames covered with canvas and painted with white gesso.
When I was creating the black leather door pieces, I stitched out a small digitised version of the door design. I made this into a pendant.

I always like to use text in my project and depict the name of the place in some way. This mobile used the letters of Venice. They were digitised and stitched out onto satins. I did two for each letter which were then placed back to back, stitched together, edged and beaded. They were then strung together to create a hanging.

While I was stitching out the main header letter V, I hadn’t positioned it correctly or given it enough space around it. However, as I never discard anything, I rescued this and created a bag tag. I cut out the letter and stitched it onto painted pelmet vilene.

The next piece was created by printing an image of the Grand Canal from the Rialto bridge onto acrylic acetate – OH projector acetate. Once the image was printed it was laid over a sheer fabric and then over pelmet vilene. The sides of the box were made from free machined green satin.

Using the water of the canals and the reflections of the gondola heads in the water as the design source, I created a cuff.


The fasteners were beads, painted with metallic acrylic paint to match.
When I was creating pieces using the music mask as the design source, I had a couple of small embossed shim masks which were still unused. I decided to make one of them into a post card. Painted pelmet vilene was the base. I made some fibre fabric from dyed fibres and machined this onto the vilene using vermicelli stitch. I hand stitched the red embossed shim mask on top of this. I added beads to represent the sparkle of the water.

I used the second embossed shim mask to make the front cover of a note booklet. I used a music machine pattern to couch down the dyed fibre fabric.

The next piece for this post used the name of Venice again. I used each individual letter and layered them in Photoshop, overlapping them and distorting them until I had an abstract of the name. I digitised this and stitched it out onto dyed fibre fabric laid over a satin. It was then outlined with couched gold thread. The remaining area of the fibre fabric was stitched down using free machined vermicelli stitch and finally small beads were applied randomly over the surface.

The final piece used the same technique. This time the letters were placed in a line and distorted to create an abstract. It was digitised and machined the same as for the bag. This time I made the fibre fabric large enough to cover the front and back of a book. It was couched in place with rows of free machined wavy lines to create the ripples of the water in Venice. I used a spare piece of printed acetate showing a small scene on the Grand Canal to create a book tag.

This brings me up to date with finished pieces.
At the moment, I am free machine quilting two large art quilts. These will be the subject of the next post.
Today I was giving a talk about my Egyptian project and tomorrow I will be leading a dayschool teaching some of the techniques I used in the project. I hope they will enjoy it.
Until the next post. Cheers everyone.
Friday, 1 February 2013
More of the Venice project
It has been a long spell since my last post and I have a long list of
pieces finished and photographed, probably too many for this post.
I begin with a return to the Palazzo Contarini with the spiral stairway. I used the image of one of the levels of the stairway which had been changed with a filter in Photoshop. This was printed on Transfer printer paper for dark colours. This was ironed onto fabric, stitched and varnished and made into s book cover.

I had a small piece of heated Tyvek which I painted with a matching pink metallic paint and added some beads and made into a book tag.

Another small piece of the printed transfer paper I made a small bag tag. This was hand stitched with a tight blanket stitch around the edge.

This little bag was a further development of the mask theme. I made a stamp of one of the masks I photographed in Venice. This was stamped onto a sponged fabric. I then free machine quilted the masks and then background quilted the background. I made four mask bag tags from felt which were stiffened with blind stiffening liquid. I used large eyelets to thread cord through to pull the bag closed.
I put the image of the mask into Photoshop and applied a kaleidoscope filter which gave me a lovely pattern. I decided to use this design to emboss onto gold metal shim. I created four of them. These were then stitched onto the four sides of an open box.

I free machined the design on the five inside sides the box. I also stitched tiny delica beads around the box edges and around the embossed metal.

Near to the water bus station which serves St Mark's square, there is a large metal frame sphere full of blue balls. I don't know if these are glass or plastic but at night it is lit from the inside. I took photographs of it while it was lit. I put this image into Photoshop and applied a filter and created a beautiful fabric design which I printed onto white cotton. It was quilted and made into a keepsake folder.
The last piece for this post was created using the window fret design I used in previous posts. This time I kept nearer to the actual colour of the fretwork - bronze. The fretwork panel was constructed the same as for the bronze vessel - pelmet vilene base, Bonda web, transfer foil and bronze sheer fabric. This panel was then stitched to the flap of a book made using quilted bronze satin.

I went to the Harrogate K&S show last November and found some wonderful bronze beads. The smaller ones were used to make the handle for the bag and one of the large beads was used to make a bag tag.
I am going to finish this post now as I feel I have used enough pieces for the time being. I have many more but they will have to wait a while although maybe not as long as the time between this post and the last one.
So until the next post
Cheers everyone.
I begin with a return to the Palazzo Contarini with the spiral stairway. I used the image of one of the levels of the stairway which had been changed with a filter in Photoshop. This was printed on Transfer printer paper for dark colours. This was ironed onto fabric, stitched and varnished and made into s book cover.

I had a small piece of heated Tyvek which I painted with a matching pink metallic paint and added some beads and made into a book tag.

Another small piece of the printed transfer paper I made a small bag tag. This was hand stitched with a tight blanket stitch around the edge.

This little bag was a further development of the mask theme. I made a stamp of one of the masks I photographed in Venice. This was stamped onto a sponged fabric. I then free machine quilted the masks and then background quilted the background. I made four mask bag tags from felt which were stiffened with blind stiffening liquid. I used large eyelets to thread cord through to pull the bag closed.
I put the image of the mask into Photoshop and applied a kaleidoscope filter which gave me a lovely pattern. I decided to use this design to emboss onto gold metal shim. I created four of them. These were then stitched onto the four sides of an open box.

I free machined the design on the five inside sides the box. I also stitched tiny delica beads around the box edges and around the embossed metal.

Near to the water bus station which serves St Mark's square, there is a large metal frame sphere full of blue balls. I don't know if these are glass or plastic but at night it is lit from the inside. I took photographs of it while it was lit. I put this image into Photoshop and applied a filter and created a beautiful fabric design which I printed onto white cotton. It was quilted and made into a keepsake folder.
The last piece for this post was created using the window fret design I used in previous posts. This time I kept nearer to the actual colour of the fretwork - bronze. The fretwork panel was constructed the same as for the bronze vessel - pelmet vilene base, Bonda web, transfer foil and bronze sheer fabric. This panel was then stitched to the flap of a book made using quilted bronze satin.

I went to the Harrogate K&S show last November and found some wonderful bronze beads. The smaller ones were used to make the handle for the bag and one of the large beads was used to make a bag tag.
I am going to finish this post now as I feel I have used enough pieces for the time being. I have many more but they will have to wait a while although maybe not as long as the time between this post and the last one.
So until the next post
Cheers everyone.
Thursday, 13 December 2012
Progress on my Venice project and a tote
Hi
This will probably be my last post for 2012. We haven't been away since the last post and as yet haven't made any plans for next year either. I have, however been busy and not just with Venice.
I have just altered a wedding dress for a wedding taking place after Christmas and will be doing a portrait photo shoot of the bride to be when she has the trial run for her hair and make up.
My grandson becomes a teenager, officially, on Friday. I say officially because he has had all the traits of a teenager for some time - as they do these days. We gave him an iPad which we now call his 'appendage' for obvious reasons.
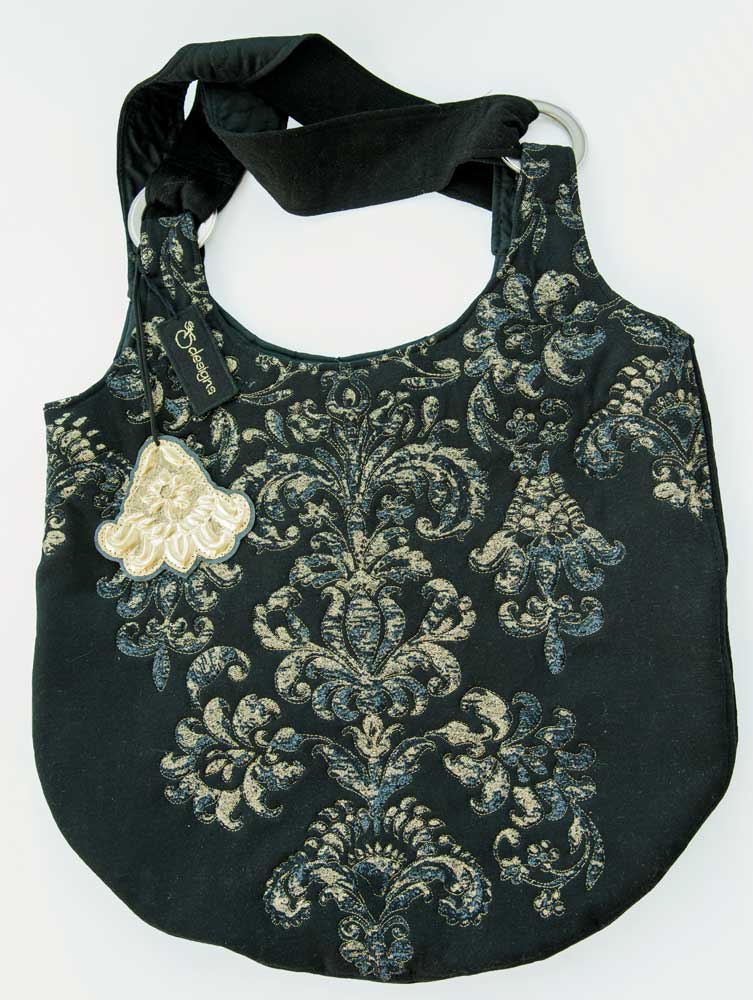
Now back to the Venice project, although I did complete a bag which has nothing to do with Venice so I will deal that first. I impulse bought a couple of dresses last year and I usual with impulse buys haven't worn them. I had considered putting them into a charity shop but one of them had such a lovely front (which is why I bought it) that I was determined to put it to some use. As the front design was so big I decided to use it for a tote. I quilted the design for the front of the tote.

I made a bag tag by embossing part of the design on the front.

No back to the Venice project. I have had the pieces finished for a while but have only just managed to photograph them.
On the last post, I mentioned that I had some surplus panels from the Ripple art quilt (because I forgot to flip them for printing!). I used one for the book cover I posted last time and I have used another one to make this pocket page booklet.

I wasn't sure at first if this would work because I would have to simply fold the panel in half and turn it but it did work. I quilted the panel and lined it with colour washed pelmet vilene and then edged with machined satin stitch. The inside pages were stitched down the spine. I wrapped some matching cord for a tie.
I mentioned that I planned to create some jewellery using the bronze fret design from the vessel in the last post and here it is.

I had to manipulate the design in Photoshop in order to create the necklace.

As well as the water buses and water taxis to ferry back and forth across the Grand Canal, there are also gondola ferries. The landing stages for these gondolas are marked with green lanterns like the one in this image. I decided to create a tassel based on these lanterns. This one was quite a challenge as it was octagonal. I did discover that they are not all the same and there were some square lanterns which would have been easier to construct - but...
I constructed the tassel head from some jade Thai silk. I used a mixture of the largest beads I had for the glass panels. It was a fiddly job.

The next piece uses the carved flower stonework featured in the last post. I made a pattern of the flowers and used my 'jewelled fabric' technique to make four small sheer flowers which were joined together to make a mobile.

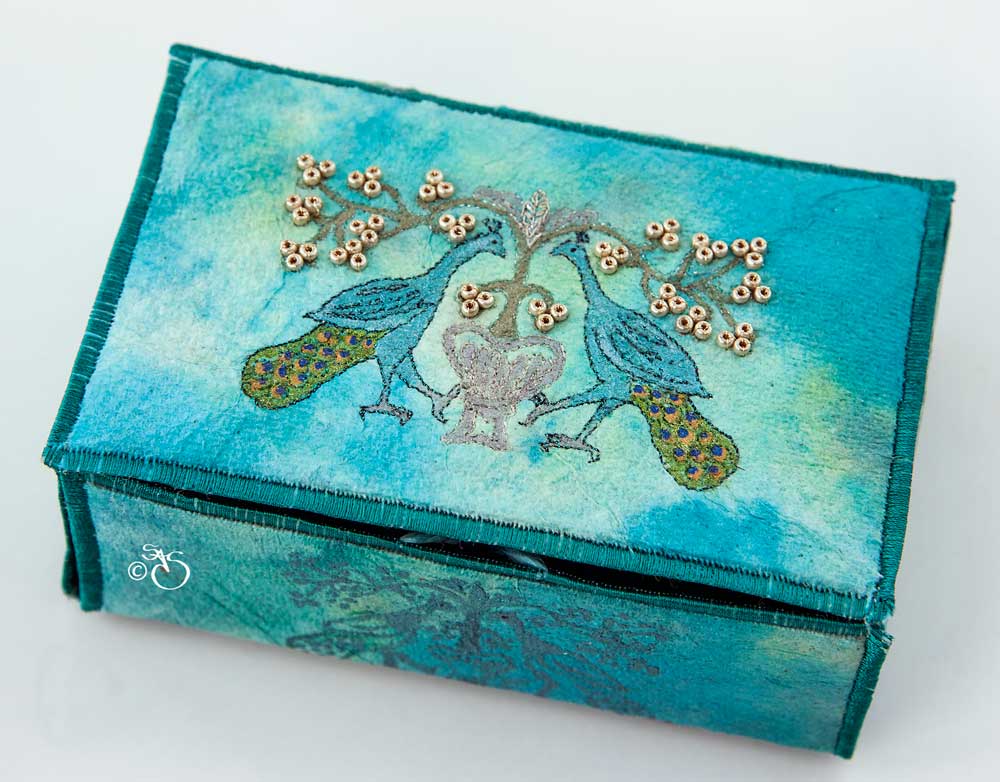
On the Basillica there was a large carved block depicting a peacock design.

I used this design to make a stencil and a stamp which were then used to create a box. I had a piece of ''mop up' paper towel in the colours I wanted to use. I ironed vilene onto the back to give it strength. I stamped and stencilled the design onto the paper. I also traced a pattern to free machine on the top and inside of the lid. I noticed that using a dense satin stitch to machine around thee edges was in places serrating the paper. The vilene held it together. Perhaps a slightly less dense stitch in future.

Some hand painting and beads finished the detail on the piece.
That is where I am at the moment. I have just begun a book and there are many more pieces on my list to create so watch this space.
Cheers for now and I wish you all a merry Christmas and should see you in the new year.
This will probably be my last post for 2012. We haven't been away since the last post and as yet haven't made any plans for next year either. I have, however been busy and not just with Venice.
I have just altered a wedding dress for a wedding taking place after Christmas and will be doing a portrait photo shoot of the bride to be when she has the trial run for her hair and make up.
My grandson becomes a teenager, officially, on Friday. I say officially because he has had all the traits of a teenager for some time - as they do these days. We gave him an iPad which we now call his 'appendage' for obvious reasons.
Now back to the Venice project, although I did complete a bag which has nothing to do with Venice so I will deal that first. I impulse bought a couple of dresses last year and I usual with impulse buys haven't worn them. I had considered putting them into a charity shop but one of them had such a lovely front (which is why I bought it) that I was determined to put it to some use. As the front design was so big I decided to use it for a tote. I quilted the design for the front of the tote.

I made a bag tag by embossing part of the design on the front.

No back to the Venice project. I have had the pieces finished for a while but have only just managed to photograph them.
On the last post, I mentioned that I had some surplus panels from the Ripple art quilt (because I forgot to flip them for printing!). I used one for the book cover I posted last time and I have used another one to make this pocket page booklet.

I wasn't sure at first if this would work because I would have to simply fold the panel in half and turn it but it did work. I quilted the panel and lined it with colour washed pelmet vilene and then edged with machined satin stitch. The inside pages were stitched down the spine. I wrapped some matching cord for a tie.
I mentioned that I planned to create some jewellery using the bronze fret design from the vessel in the last post and here it is.

I had to manipulate the design in Photoshop in order to create the necklace.

As well as the water buses and water taxis to ferry back and forth across the Grand Canal, there are also gondola ferries. The landing stages for these gondolas are marked with green lanterns like the one in this image. I decided to create a tassel based on these lanterns. This one was quite a challenge as it was octagonal. I did discover that they are not all the same and there were some square lanterns which would have been easier to construct - but...
I constructed the tassel head from some jade Thai silk. I used a mixture of the largest beads I had for the glass panels. It was a fiddly job.

The next piece uses the carved flower stonework featured in the last post. I made a pattern of the flowers and used my 'jewelled fabric' technique to make four small sheer flowers which were joined together to make a mobile.

On the Basillica there was a large carved block depicting a peacock design.

I used this design to make a stencil and a stamp which were then used to create a box. I had a piece of ''mop up' paper towel in the colours I wanted to use. I ironed vilene onto the back to give it strength. I stamped and stencilled the design onto the paper. I also traced a pattern to free machine on the top and inside of the lid. I noticed that using a dense satin stitch to machine around thee edges was in places serrating the paper. The vilene held it together. Perhaps a slightly less dense stitch in future.

Some hand painting and beads finished the detail on the piece.
That is where I am at the moment. I have just begun a book and there are many more pieces on my list to create so watch this space.
Cheers for now and I wish you all a merry Christmas and should see you in the new year.
Subscribe to:
Posts (Atom)