Tuesday, 22 September 2009

Rusty folder

I wondered why I have been feeling so tired and lethargic of late but yesterday I discovered why. I have developed a throat infection and cough and it is affecting my ears too. However I don't feel so tired and lethargic now so the worst must be over. Just need to get rid of the sore throat and cough.

I have not been doing quite so much in the textile field as I have been learning how to create photo slide shows with music. They are usually referred to as VA's. I created my first one for my daughter's birthday - at her husband's request. It started out as just being a little slide show of her growing up but developed into one with music and all the photos fitting the words of the song.

With one under my belt, I decided to go further and use some of my own photography and create a VA I have called 'The Changing Year'. I used iDVD on my Mac to make the first one but I wanted even more control over this one so I have had to learn how to use iMovie on my Mac. I knew which music I wanted to use but I only had a copy of it on an old cassette so I had to go on line and find a new CD copy which I found and bought with a few others!!! Like my music.

I waded through all my photographs and reduced the choice down to 72 of them. I played with the different transitions and times and calculated that I needed about 8 and a half minutes. This meant that I would have to have at least two pieces of music and join them together. No probs - there is a free download of a program for editing music. It is called Audacity. I downloaded it and have learned how to use that and have now not only joined two pieces of music with fade in and out and removing bits that didn't fit at the blend but also selected a phrase of music and pasted it in to lengthen it by 30 seconds to fit my slideshow exactly. I found it all much easier than I envisaged although that is down to the two programs making them reasonably easy to use.

So I now have an AV called The Changing Year which runs for just over 8and a half minutes with music. Planning my next one now. Just looking for the images to fit the piece of music I have chosen.

Now for a textile piece.

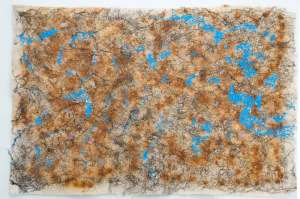
When I was at the FOQ, I bought some Rusting powder so this piece is the result of trying it out.

I cut a piece of fabric, wet it and laid it in a tray and sprinkled some rusting powder over it then spritzed it with white vinegar.

Rusty-1

I left it to cook for a couple of days until the depth of colour was strong enough.

Cooked-fabric

It was washed and ironed ready to decide what to do with it.

I have been going through a bit of a 'can't decide what to do next' so eventually decided to use this fabric and create something. I decided to make another pad folder as it was the right size.

I sponged the surface with bronze metallic paint then ironed some black FuseFX over that followed by blue transfer foil.

Adde-layers

Again, a chance to use up some sample bits - I painted a paper cast of a brooch and some Tyvek which had been imprinted with a stamp design using an iron.

I also dyed some yarn to couch over the surface.

Open-cover

The motifs were stitched in place with free machining and the dyed yarn was machine couched in a design picked up from the centre paper motif.

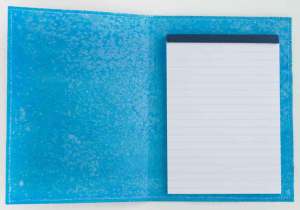
I painted some blue card with brusho and sprayed Starburst stains over that and sprinkled salt over that to create the mottled lining.

Inside-folder

It was edged with a zigzag over stitch with a metallic thread.

Cover

And here is the finished pad folder which has turned out better than expected.

Now back to' what do I do next'???? Off to the workroom and hopefully.....

Cheers for now everyone.

Tuesday, 8 September 2009

Canvas file cover

At last I have finished the canvas file cover. It has taken a long time as it has all been hand stitching.

I have always enjoyed doing all the different techniques in textile work and that includes the traditional as well as the very new. In fact I always use whichever technique that gives me what I want and I often combine them if that is what is required.

Because I have had this wide range of interests it means that I have a wide range of materials and 'stash' as we like to call it now. It is a good word - it sums up my hoard perfectly - another good word!


I have been doing a bit of reorganising lately - making room for more 'stash' and came across a roll of canvas the hessian coloured kind. I decided to use some of it but for what. Then I spotted the large ring files I have in store - 8cm deep ones. They are useful to store samples and small pieces in clear plastic files and being 8cm deep means you can store quite a lot. I have one in use at the moment which i made a cover for not long ago. So I decided to make another cover ready for when the current file is full.

I cut the canvas to size - large enough to make flaps at either end and turn unders along the edges.

I painted the canvas on one side with black acrylic paint. When it was dry I used Liquitex gold, green and blue interference medium and gently finger brushed it over the surface blending the three colours as you can see on the back of the cover.

Not as shiny and vibrant as in reality.
I placed squares of Irise film behind to catch the light. It also reflected the same colours as the interference mediums I was using. I would be stitching through the film to hold it in place.

Next I had to decide what to embellish on the front. I began to scribble and as you can see doodle as I incessantly do.


I could not get squares out of my head probably because the canvas is all squares. So I decided to go with a squares design. The one above was the starting point and guide and I didn't change it too much.
I sorted threads , mainly metallics - my favourites. I didn't have all the colours I wanted so first I had to dye some. Once I had my threads I began with the square in the bottom right corner. I couched the cord around a square. Inside that I canvas stitched another square. Now here's the suprise. A number of years ago I bought lots of those hanks of glitter threads you see hanging on some of the stands at the shows - cheap. On returning home and emptying out the goodies comes the - 'why on earth did I buy that!' The answer is usually impulse and it was cheap. So they are stored away probably never to be used. Well, while picking out my threads for this piece which always includes every box I have I came across this hank of very shiny glittery 'Christmassy' coloured metallic cord. The biggest suprise was that it worked. It looked right. This sent me rushing to get other shiny glittery threads which would contrast in the same way (but not quite as much!!)
I had already decided to use a burnished copper shim for the centres of the large squares so that was the next task - to draw a little square design to emboss on the shim.


I embossed this little design onto the shim and stitched it into the centre of the square outlining it with another metallic twist. I left the remainder of the shim squares until the end so as not to damage them during the stitching. I just wanted to see how one would look in case it didn't work - but it did.
Now I could continued with the rest of the squares. To help set it out I cut paper squares of different sizes and laid them onto the front and when in the correct position I pinned them in place.
At this point I came up with another idea. I had thought of using black felt squares with machining on them and stitching them to the surface but didn't like it when I placed a piece of felt on the surface but then I decided to stitch a machine pattern of squares on strips of felt and when I placed these on the surface I liked them so they were stitched in place.
All the large squares were stitched first followed by the next size and so on. How each was done was decided as I came to them and so the design grew.
The space between all the squares was originally to be small square blocks spread randomly around but as I began it changed into being an all over checkerboard fill using dyed glitter thread and six stranded embroidery thread. I had to keep dying a bit more and a bit more of the threads as I went as I wasn't sure how much it would use to do this pattern.
When all this stitching was done I embossed the shim and stitched them in place. I used my logo for the square on the spine. Here it is reversed.

I reversed the logo before embossing so that when the shim was turned over the logo would be prominent rather then indented.
I also stitched beads in the centres of the smaller squares and a jewel was held in place in one of the squares with knitted metal tubing/ribbon but a very fine black one.
The edges were turned under and I over stitched with a thick black rayon yarn that I had in store.
The end flaps were turned under and stitched and the file inserted.


It took quite a long time to stitch but I like the finish. It does look much more vibrant in reality than in this image. Metallics are so difficult to photograph.


I have been doing other things while making this file cover.
On our grandsons last day of the school holidays we took him to Richmond castle (the one in North Yorkshire not far from us). He enjoyed his photo shoot and the picnic.
We climbed up to the top of the castle keep and had I known how many steps there were I may have stayed below. The views were stunning to compensate.
Lots of wall texture.

And swathes of bright yellow Echinacia in the castle garden.
and patterns on the paths.

Lots to photograph.

We went down to the waterfalls which are a very special colour due to the peat content. The are very loud when you get close to them but we took some fabulous photographs freezing the spray and water in mid air.
Yesterday was such a glorious day we went to the Yorkshire aircraft museum which has lots of outside displays. Lots to photograph including this very rusty wheel centre just for Lynda.


A long post and now I am ready for lunch so cheers everyone.