Sunday, 27 July 2008

Quilted shadows

My blog is a bit late this time as I have been struggling with how to proceed with the latest pieces of work.

Last year I revisited Durham University botanical gardens to retake photographs of some figure sculptures in the gardens. I had decided to use these sculptures for a series of quilted art pieces. There are six of these sculptures arranged in a circle. Each one is a wooden carving of a leading figure who had a great influence on the area in the Durham Wier valley. They were carved from elm trees which had been felled because of Dutch elm disease. Three of these figures were of men who had influence many centuries ago and the other three who had great industrial influence in the area. Each was given what the sculptor called a 'shadow' which is what I was most interested in. These shadows were made of metal and a fretwork cut into them depicting a scene which related to the influence they left behind - like a shadow. You needed to stand in the centre of the circle to see what the scenes were. I chose the shadows of the three oldest influences.

This is the 'shadow' of William of St Calais who was a Prince Bishop from 1081 - 1096. He began the construction of Durham Cathedral which is depicted in his shadow. He was also involved in the compiling of the Doomsday book.

This is the 'shadow' of John Cosin who was Prince Bishop 1594 - 1672. He had a great influence on architectural styles and built Aukland Castle which became the official seat of the Bishop of Durham.

Both of these men were very powerful and advisors to the kings which is why they were called Prince Bishops.

This is the 'shadow' of Ralph Lord Neville of Raby Castle. He was given prominence after he helped defeat the invaders from the North at the battle of Neville's cross in 1346.

Once I had decided on the three shadows, the images were isolated and changed to black and white then into lined drawings using Photoshop. These drawings were sized to be about 60cm high and printed out to use as patterns.

These patterns were then traced onto white satin using a soft pencil. Then they were backed with 2oz batting and cotton. I free machined each of the shadows using a dark grey rayon thread.

Here is where I started to struggle. I had thought that I would quilt the backgrounds with a white thread and an all over fill such a vermicelli but at this stage I had second thoughts. I asked for input from Lynda and Sharon who gave suggestions - many thanks to them - and so I went onto the computer to simulate some ideas.

Here is one of them :

I wasn't happy with any of the simulations and finally decided to cut the shadows out and apply them to another background. I simulated this and liked it. So this is how I am going to present them.

The text will be stitched up the side of the quilted shadow on the background fabric.

I had some dark grey fabric which was just the right colour but not enough to do all three shadows. I will have to go and buy some - hopefully I can find a similar fabric. hard to believe I didn't have what I needed in stock given the huge stash I have!!!

I have had my grandson staying for a couple of days so we went out to the local park to do some photography. He sees pictures in everything and is developing all the attributes of a good photographer. He took in excess of 100 photos. here are just three of them.

Isn't he doing well for an eight year old!!

I have begun a new piece and will get on with it when I have finished the ironing!!!!!! Uggg

Cheers for now.

Wednesday, 16 July 2008

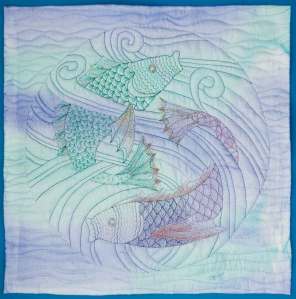
Finished Pisces art quilt

At last I have sent the manuscript and CD's of images off to the publisher. Now I look forward to seeing how they lay out the pages. I wonder how much input I will have from now on.

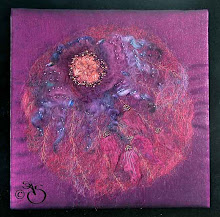
With all the rain we have been having recently I have been able to do a lot of stitching. I have finished the Pisces art quilt sooner than I expected. It is all free machined and has turned out very 'pretty' which wasn't intentional. It just grew that way and I like it. Best of all , I really enjoyed stitching it. I find free machining very therapeutic. As usual, photographing shiny fabrics and metallic threads isn't easy and so the richness and sheen isn't quite as it is in reality.

I did think of putting some beads onto it and am still undecided. i will keep looking at it and if the urge doesn't present itself strong enough I will follow the saying ' If in doubt, leave it out'.

Close up of the aqua green fish.

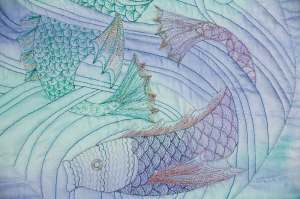
Close up of purple fish.

I have already started the next piece. Spent much of today testing out different dyes on some fabric. I need to pin notes to each test piece so that I remember what I did.

It was a nice day yesterday so we went to our local market town for a walk by the river. Bought some fabrics and replaced some of the threads I used up on the Sheep in the snow quilt. Back for lunch and then a run to Whitby which was very busy with all the coach trips that descend on the town this time of the year. We didn't stay long.

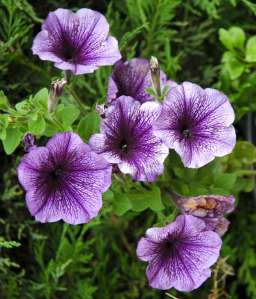
The garden is looking good - very colourful. Two of my favourite flowers are at their best at the moment.

Petunias
Petunias
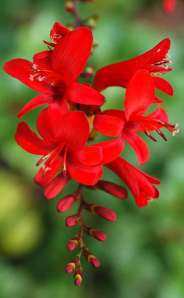
Satan's tongue
Satan's tongue

Satan's tongue is sometimes called 'mother-in-law's tongue'. I prefer the former. It is such a rich red colour.

Time to get back to my next piece so cheers everyone.

Sunday, 13 July 2008

Second piece of the 'new batch'

The Memories piece is finished and as it is very similar to the already posted image unless looked at closely I am not going to post another image of it. When I look at the three layers of stitching, I wonder how many Sorbello stitches I have stitched.

I have now begun the next piece. I chose one of the Art Nouveau designs which I now realise is an interpretation of the star sign Pices. I was well on with it before I twigged. Although I am not into star signs or astrology, the designs for them have been the source for a lot of art. I have a collection of Celtic design star signs which are beautiful pieces of art.

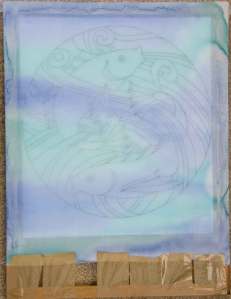
First I isolated the design from the page and enlarged it to 30cm square. I printed it out for my pattern. Next I stretched some silk over a frame and colour washed it.

I taped the printed pattern onto the back of the silk and traced the design.

Now I needed to choose the threads I would use. I have to admit that I do have a lot of threads collected over many many years - and still collecting. I love rayon and metallic threads the best. This is the colour palette I chose. I was torn between bold and bright or cool and gentle. I chose cool and gentle.

One of the fish is to be aqua based and the other purple. The blues are for the sea of course. There will be further additions - possibly metallic twist but I will decide that as I go.

Some years ago when I was working on one of my big projects, I dyed some rayon thread in the variegated colours I needed to matched the landscape colours in the photos I took. I still have some left and pleased it will fit into this piece.

The silk has been removed from the frame and sandwiched with 2oz batting and a cotton backing. I have already stitched the two fish and I am really enjoying it. Free machining is my first love and the more intricate the better and these fish are very intricate. You will have to wait for the next post to see them.

Cheers everyone.

Monday, 7 July 2008

Memories

I am well on the way with the first piece off the list of future pieces.

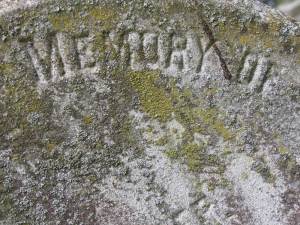
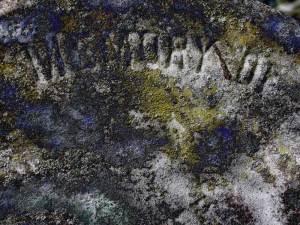
When I was out doing some photography a year ago now, I took some photos of the lichen on the stone including on one of the gravestones. The carved text said 'IN MEMORY OF'. I put the photo into Photoshop and applied one of the filters. I obtained an effect which appealed (not to everyone I would imagine but each to their own). I could see a small piece based on this image.

Original photo
Original photo
After special effect
Rather than use the text on the gravestone I decided to change it to MEMORIES. I wanted to stitch the text
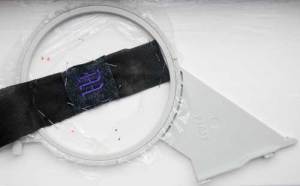
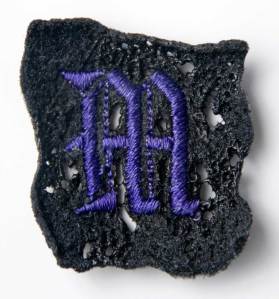
onto acrylic felt and zap it with a heat gun to distort it. I wanted to use rayon thread and wasn't sure how much heat it would take so I made a test sample - very unlike me . I set up the hoop for the embroidery machine to stitch out just the letter M.
Hoop set up
As you will notice, I am a very careful user of materials and have developed ways to mount in the hoop using as little as possible. This is why I save all scraps of everything. They always come in useful as with the strip of black stabiliser in this hoop. It is pinned to the water soluble stabilser left from another stitch out. Just the right size piece of felt is pinned to that and the letter stitched out.
I removed the letter and cut away as much of the stabiliser as possible from the back then zapped it with a heat gun.
As you can see the acrylic felt has melted and distorted and the rayon thread has withstood the heat which is what I hoped would happen.
I also noticed that the felt on the other side was still as original and did not have all the solid melted hard surface on the front.
I decided that when I stitched out the full text, I would zap it from the reverse so the soft felt would be on the front.
I created the MEMORIES text in the digitising software for the embroidery machine and sent it over to the machine. I set up the large hoop in the same way as for the sample.

Another left over strip of black stabiliser did the job again. The machine stitched out the text. When complete it was removed from the hoop and as much of the stabiliser as possible was removed from the back.
The text was placed on a cork tile and zapped with the heat gun.
Remember to take precautions when zapping acrylic felt with a heat gun.
I made the background by painting a piece of very textured hand made paper with grey acrylic to represent the stone. I coated this with acrylic wax before sponging the surface with blue and lime Byzantine paints. I then stitched over the surface with threads and used one of my favourite stitches - sorbello st. This will be layered up using finer and finer threads until I am happy with the texture. The stitching shows through the zapped text. This is the unfinished piece - just some more layered sorbello stitching to do and finishing off.
One for the sample book.
I have colour washed a piece of silk ready for the next piece and will start that tomorrow. I am going to do some digitising for another piece now which will help me learn the new 4D software. I hope it will do what I have in mind.
Cheers everyone.

Saturday, 5 July 2008

Preparation for the next batch

I am now ready to start some more new pieces. I have developed a strategy for this over the years. I rarely design one piece at a time. I usually design a big batch and work through them although I will still veer off course and do others if something crops up and then return to the list.

I spent a couple of days browsing through all my photographs and choosing those which have rung the design bells. I also browse through my books especially my rather large collection of Dover books full of design ideas. I don't altogether feel totally happy using these but they are an excellent start source. I will probably change them significantly or just use bits of them etc.

As I am choosing the photos and designs I am also making design idea notes on each one, writing down techniques which are suggested, making little scribble sketches etc. Then I put all the images into a file and print out a contact sheet to refer to.

The next stage is to load each design into the computer and begin to work on them. Many need to be sized and turned into patterns which I will use to trace the designs onto fabric or cut out fabric. Some convert easily and some not. One or two images will suggest more than one idea so I will create all of them - 'variations on a theme' as I call them. Many will start as one idea and finish up totally different. Some will simply grow as I work on them. Sometimes when rummaging through my 'stash' I come across materials I forgot I had -tut tut- and then the piece may be material led.

When making a pattern from a photo, I open the image. turn it into a black and white, up the brightness and contrast, take away any areas I don't want, then use the filter/effect find edges or photocopy - whichever gives me the best lined drawing.

They are then sized and printed out. I do any tweaking to the pattern once printed e.g. defining some of the lines with black felt tip pen.

I plan to print some of the photos directly onto fabric so I will either dip in Bubble jet or coat with Inkaid. I also plan a visit to Whaleys in Bradford who do prepared fabrics for inkjet printing on the roll in wide widths. Can print A3 size then and with any large pieces have less joins.

I have a couple of stamps to make for a couple of the pieces. This will be done with Funky foam. Lots of painting, dying and digitising for the embroidery machine. Must try to include using my embellishing machine too. So many techniques and materials to choose from!!

So far, then, I have done about 30 designs to work on which will keep me busy for a while. I also want to work on another themed project but can't decide on which one yet. Could do with more hours in the day couldn't we???

Finally, and you will probably read about this on Sharon's blog too, I wanted to mention my visit from Sharon and her OH earlier this week. We had a fabulous day together and our OH's got on well too and left us to it. It couldn't have worked out better other than it lasting longer. So much to talk about. Hope to see them again - they are always welcome. Maybe a longer visit next time.

Now back to all these designs. Haven't decided which one to start with or maybe I will work on several at the same time!!!!!

Cheers everyone.