Friday, 9 April 2010

More Art Quilts

Time for another blog.

Spent this morning out with my OH and my grandson on a photo shoot. We went to one of our two unique famous bridges - The Transporter bridge. I prefer to take odd angled images so I didn't take a full conventional view of it to show you.


When I was a teenager in the days of tight pencil skirts and winkle picker stiletto heels and backcombed buffon hair - a few of us decided to cross the bridge the hard way - up and over the top. And yes, we were dressed in pencil skirts, stiletto heels and backcombed hair with lots of hair spray. We looked a bit hot, sweaty and wind blown - in spite of the hair spray - by the time we reached the other side. These days, this climb and walkway have been closed to the public - sadly because of suicides. It is a long way down to the river below. I shudder at the thought of it now.

The weather, at last, was glorious even down by the river quayside. My GS took his usual huge batch of images which we managed to whittle down when processing them. He is becoming more discerning about what he keeps now. He has always loved this bridge which he called 'blue ferry' and we used to take him across regularly when he was younger. It has a cradle which you drive onto and it travels across hanging from the span.

Between all the photography sessions, I have managed to do some textile work.

I mentioned the Stone Queen in the last post. I printed the image onto white cotton and then highlighted areas with metallic acrylic paints and then free machined it.


I have also created another art quilt which started out as a photograph of some leaves on one of my house plants. I put it through a serious of special effects in Photoshop and the results triggered an idea for an art quilt.

This is the first panel. I loved the colours.


This is the second panel.


I used these two to create a composite.


The panels were printed onto white cotton. Obviously the colours would not be as vibrant as on the screen but I made them as strong as I could by sliding the saturation level higher and also the red and magenta to get the purple I wanted. I always test print on a piece of the same fabric and adjust accordingly. The panels were printed so that I could stitch each one individually.

When they had been printed, I painted some areas with metallic acrylic paints before free machine quilting them.

Once all the panels had been stitched they were trimmed and butt joined together. I used a wide zigzag machine pattern to join the panels and a narrow zigzag to edge.

I decided not to give the piece a border.

The final quilt is less vibrant and I still haven't decided on the black four petal crosses over the windows and over some of the joins. I made some mock ups and laid them on but could not decide which I preferred. So as I always say - 'If in doubt, leave it out'. So I have for now. This is a close up of the top set of four panels


The final quilt is about 50cm long and I used one of those furnishing samples I mentioned in my last post. They make excellent backing for quilting.

I am now ready to begin thinking about what I am going to do next so cheers for now everyone.

Wednesday, 24 March 2010

Bags and books

Time to blog again and an update as to what I have been doing recently.

A friend of mine dropped by with a big bag of furnishing samples. These are the ones you see in the big books in furniture shops.


I don't ever say no to a free-bee and after she had left I began to wade through the pile putting them into sizes, colours etc. As I was doing this the design bells began to ring and I could see bags and books and folders and many of the pieces would be very good for the backing of art quilts so I doubt that any will go to waste.

The first piece was a bag using a piece of striped red fabric. I covered it with a silver scrolled sheer fabric over angelina fibres and used the design on the sheer to make bag tags.


Onto the next piece.

I used the back of the fabric for this piece as I liked the design better on the back than the front. I machine couched yarns down the stripes and picked out the three leaf trefoil and digitised it to stitch out on the machine many times in two different sizes. Twisted and wrapped yarns were stitched around the edges and to make the fastener with two more trefoils on the ends.

The next piece of fabric became a shoulder bag. I picked out the printed border design and embellished it with fancy yarns, threads and beads. I used a matching knitting yarn to plait a long handle.


Using a similar fabric but in different colours I made another shoulder bag.


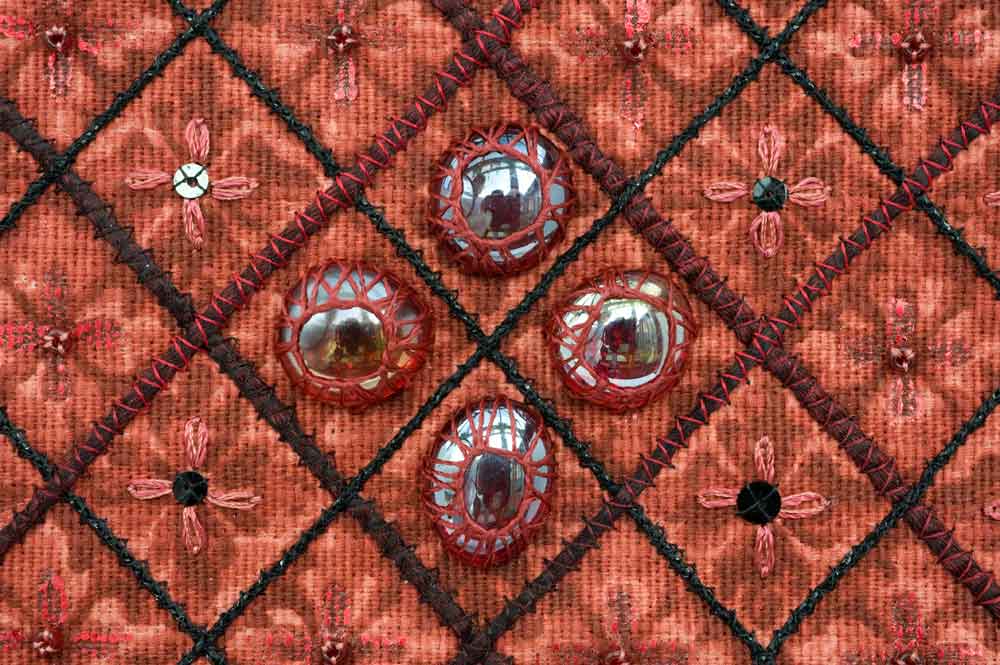
The next piece of fabric suggested a folder using the diamond design on the fabric. I picked out this diamond design and created an embossed shim accent for the centre. I also used alcohol ink pens to colour the shim. I used transfer foils to pick out the flowers in alternate diamonds and sequins for the remainder with hand stitched daisies. Gold thread and dyed chenille yarn was machine couched along all the diagonal lines. I sprayed turquoise card with Starburst stains and glued it to the inside to form the lining then machine couched more chenille yarn around the edges. I used the same yarn machine wrapped to create the tie.


A similar piece of fabric, but in reds ,was made into another folder. Again I used transfer foil on the little flowers and black beads and hand stitched red daises. Black and red yarns were couched along the diagonals and around the edges and to make the tie. This time I used four red glass jewels for the central motif. They were stitched in place using needle weaving. if you look closely you can see me taking the photograph. I forgot to put the polorising filter onto the lens....


The final piece for this post is this little book. The round medallion was a paper caste over an old brooch painted and rubbed with gilding wax. I made the pages of the book by painting some pages from a book and stamping them and the remaining pages were folded to make pockets. I stamped these too. They were all machine stitched down the spine of the lining fabric. The front and lining were stitched together with card inserted inside to stiffen.


I couched gold ribbon and fancy threads down the spine. Gold elastic was used to fasten the book closed.


Finally, at last, I have plucked up the courage to install the continuous feed ink system onto my A3 printer. I have had this system for two years being too apprehensive to install it. So, I engaged the help of my daughter and together we managed it. There were a couple of air locks in the lines but eventually it all installed and works - thank goodness. All I need to do now is to buy some bottles of ink and keep the system topped up which won't be for some time yet as there is a lot of ink in the system bottles. It works fine and I have tested it by printing out my stone queen design for an art quilt. It has been sponged with some metallic paints and is now ready to free machine quilt. It will probably be in the next post.

The world figure skating championships are on at the moment so I will be watching them for the next few days while I am working on some of my digital imaging on the computer. It is one job I can do while keeping one eye on the TV.

Until the next posting - cheers everyone

Sunday, 21 February 2010

Digitally created images and higglety houses

Another long gap but I have been creatively busy. I am very much into digital imaging taking and using my own photographs. I have even subscribed to the magazine Photoshop Creative which I find extremely useful for all those tips and techniques. I don't like everything covered in the mag as some of the creations are a bit OTT but I have learned a lot never the less. The downside of this is the time factor. It is very time consuming but I love it.

These are some of my digital images:


I have still been creating textile pieces too. Many of my photographs and digital images are often turned into textiles. This next image was the starting point for another art quilt. It was taken while on a walk around the city walls of Chester. They caught my eye because of the zig zag of the gable ends and the different colours.


The image was cropped, the bland sky replaced and a special effect applied.


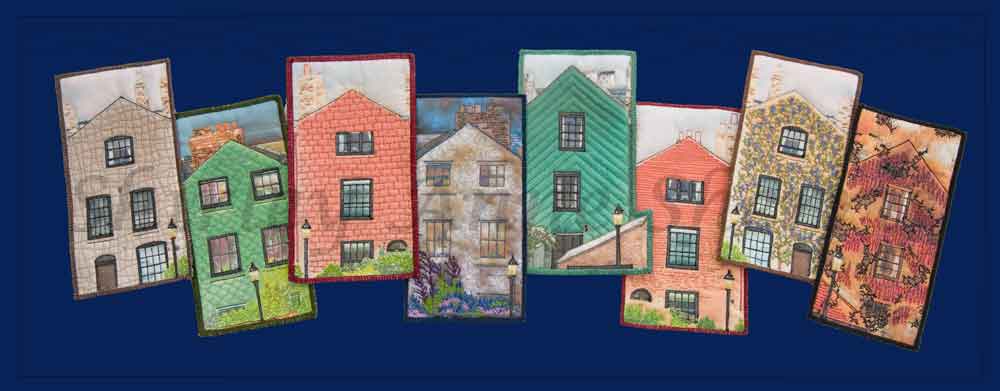
Next, I duplicated the row to make eight houses and gave every house a lamp post. Each house was then separated from the row and further effects applied. Some were flipped. Some had a colour change and a border applied. Next I played around with the layout of the houses. I planned to stitch each one separately and then combine them back into one long art quilt. I wasn't too keen on a straight line so I arranged them in a higglety pigglety layout.


Each of the houses was then printed onto white cotton using pigment inks and an inkjet printer. They were each made into a quilt sandwich and free machined. They were all edged with machined satin stitch. I played around on the computer with different coloured backgrounds for the houses and the best one was a dark blue. I did think that black would have been the best but when I filled the background with black it dulled and took the vibrance off the houses. So dark blue it was. I quilted the background and applied the houses. I haven't taken a photograph of the finished house quilt yet but I did photograph the individual finished houses so I have created a simulation of the finished piece.


Sharing out my time with photography, digital imaging and textiles is not easy. Not enough hours in the day!! There is also family and getting some exercise and the dreaded 'housework' which tends to go to the bottom of the list of 'to do's' these days.

I am off to do some exercises on the Wii, then a soak in the bath, something to eat then on with some machining on the next textile piece.

So until the next post - cheers everyone.

Sunday, 31 January 2010

More art quilts and MORE snow!!!

Another long gap but I have been busy and not had the time nor the light to do the photography. However, I now have something to blog about. I did the photography today and took some more images of yet MORE snow!! I suspected that our share of snow wasn't over but I was hoping to be wrong.

As I often create composite digital images, I take and compile files of images that will be useful so I took the opportunity, today, of taking some more snow images. We have a block set drive and it didn't take long for the snow to begin to melt and create patterns-


It has cleared completely now - let's hope it stays away!!

Now for some creative textile pieces. Some time ago I took a photograph of a rubber molding mat, opened it in Photoshop and played around with it. I created three images which I liked.


I used these three images to create three art quilts. I made patterns for each one and using a light box traced the designs onto the fabrics. I used a white crayon on the dark green fabric. The two dark green designs were then painted with metallic paints. Once the painting was complete I made up the quilt sandwiches and free machined the designs. After the turquoise quilt was stitched, I sponged the surface with a black granite metallic paint. The three were edged and hung as a triptych.


Last summer - seems a long time ago now - my OH and I went for a photo shoot at an old derelict railway yard which is now a kind of restoration museum. Growing amongst all the rusty bits and pieces and old wagons were beautiful tall foxgloves. They grow in places like that but will not grow in my garden!!.

I took photos of them and these became the subject of my next art quilt.

I opened them in Photoshop and as usual played with all the settings, filters etc and then I began to create a composite from the different images and selections from those images. I always intended to make one of these images into an art quilt but it was after buying Charlotte Zeibarth's book that I decided to combine both of them into the one piece. I recommend her book and also her web site.


This was the original composite which I had every intention of keeping to, but as the piece progressed I changed my mind.

Each of the images - the long image on the right, the three horizontal images on the left, the two selected flower heads, the four mini horizontal images and the ten selected bolts - were all printed on white cotton. I use an A3 inkjet printer with pigment inks. There is no need to treat the cotton when using pigment inks. It is at this stage that I made the first error which contributed to my change of mind on the final composition. I forgot to flip the centre horizontal image. Once printed, I highlighted the flowers with metallic paints.

All the printed and painted pieces were then made up into quilt sandwiches and I proceeded to free machine them using a mixture of rayon and polyester cotton threads. When they were all stitched, I laid them out on the studio table and began to create the composite. It was then that I realised that I had forgotten to flip two of the images - grrrr! However, when I laid all the small images over the top of the large ones I began to realise that a lot of the very detailed and intricate free machining was going to disappear under these patches. Me being me, I could not come to terms with this so I began to redesign the composition. I came up with an alternative design and stitched all the main body pieces together first, then those patches which I did want over the top - ie the bolts and finally I joined the remaining small pieces.

The whole piece was edged with a zig zag machine stitch which enclosed a six stranded embroidery thread. I was not disappointed at all with the final piece and it adds to my list of successfully rescued pieces. It is about 60 x 70cm. I gave it a coat of acrylic gloss medium which enhances the colours and protects the surface. It does, however, change the feel of the surface but if it is to be hung then it is beneficial.


and a close up of some of the detail.


I am now on with the next piece - another art quilt but very different to this one. I will post about it when it is finished.

Until then - cheers everyone.

Monday, 4 January 2010

Happy New Year to everyone and hears wishing you all a very creative and satisfying year.

We have lots of snow here and as usual this country is not very good at coping with it. It looks very pretty and for me I prefer to look at pictures of the snow rather than endure it. I was brave enough at one point to go out and do some photography but stayed inside my garden. I took this one just outside my front door.


I ventured a little further and found this 'snow tongue' on the mahonia. This bush is in blossom at the moment and the blossoms that were out have suffered with the ice but there are new ones coming out.


I liked the way the snow landed on the conifers looking like a 'snowfall' of snow.


In the back garden the pond was well frozen.


There are lots of frogs down under there. Brrrrr.

My OH has just gone out to the coast to do some photography and as keen as I am on photography I declined to go. I must admit that I am a bit of a fair weather photographer.

Now to the zentangles. I have always been a compulsive doodler and it seems that my grandson has the doodle gene in him too as he loves to doodle and they are very mature considering his age. Doodles are also known as 'Zentangles' and there are web sites dedicated to them. This is a link to one of them Zentangle Gallery.

I have come across a few zentangling/doodling bloggers who are also textilers and quilters too. Here are their links if you are interested - Artopia - Janet ; Finishing Lines and The Quilt Rat .

Back to my zentangle piece. I decided to make a checkerboard quilt with black zentangles on the white and white zentangles on the black but when then the black on white zentangles were complete I felt it was more effective leaving the black squares black.


The photograph isn't as it should be as my usual photo studio in the conservatory - which gives me such good light - has the roof covered in snow and is darker than I like. I always try to use natural light when photographing textiles and still life pieces. This piece was pinned to a board, propped up against my computer monitor with light coming directly at it from the south facing window. I had to use the 20mm lens as I was so close to it so adjustments had to be made. However, it does show the effect of the 'Zentangle Checkerboard Quilt'.

It reminds me of the chess board I made for my daughters wedding present. I made a blackwork board and created blackwork designs using hers and her husbands initials. A for the 8 black square on one side, C for the 8 squares on the other side and a combination of A and C for the 8 centre squares. I remember one square took 8 hours of stitching. I bought them the Lewis chess set to complete the gift. I also drew the designs on paper showing how the letters had created the designs and this was stuck on the back of the board.

I never took a photograph of their board but here is the one I made for myself and my husband using the same criteria.


Not a very good image as it was taken many, many years ago on slide film. I must get around to retaking all the slide photo pieces - when I have the time!!!! Speaking of which - it is lunch time so cheers for now everyone.