Wednesday 29 July 2009

Bookmarks by the score

Now that the excitement of the book release is over it is time to get back to some serious blogging.

Everything is a bit quiet out there in blogland as many bloggers are taking a break from blogging. I do hope, however, that they still have a look and a read even if they don't comment and blog themselves at the moment. Having a lot of blogs to follow can eat into time and that is something we do not have enough of. We would all love to have more hours in the day, I know I would and it is true - the older you get the faster time passes. No sooner have I got up in the morning than it is time for bed and I am a night owl not going to bed until well into the early hours. Trying to fit in all the things I love to do (not including the dreaded housework and for me cooking!!! I might add) is getting harder.

OK now to the creative stuff.

Today I spent the day preparing my images on the computer and printing them onto silk ready to create some art quilts. I brought two rolls of freezer paper back from America for this but after using it for three prints some up to 30 x 60cm I find that it does the job and I will continue to use it - well I have to now that I have so much of it - but I prefer using 505.

Last week I continued to make more little pad folders using the same criteria as the ones on a previous blog ie. to use up the many samples I have stored. I will show a couple of them as I can't find the images of three of them so will have to take them again in daylight tomorrow.

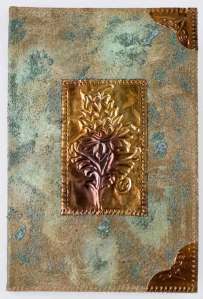
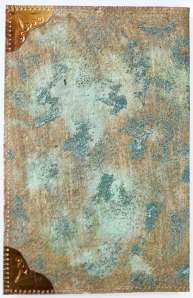
This one used the technique I used on a previous book - that of creating a rough patina finish. I painted a piece of card with the metallic bronze paint and while it was still wet splashed it with green patina fluid and sprinkled bronze patina embossing powder over the surface. When it was dry I zapped it with a heat gun.

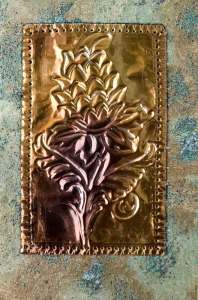
Next I burnished some copper shim and embossed a design onto it and machined this onto the front of the folder. I also made four embossed shim corners. I lined the folder with some mottles paper and stitched around the edges.

Patina-shim-pad-folder-front

This is the front.

Patina-shim-pad-folder-back

This is the back.

And this is a close up of the embossed shim.

Patina-shim-pad-folder-close-up

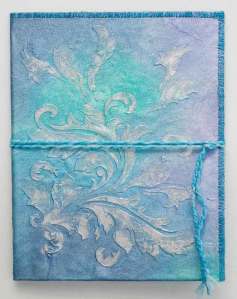
As many of you out there have done, I too bought Lynda Monk's book and used one of her techniques for this next folder.

I made a number of stencils to use with this technique and to use with paint too. I always get carried away when I do these things and actually finished up with a lot of stencils.

I painted some twill fabric with white gesso then using one of my stencils and molding paste created the raised acanthus leaves on the front and back. When they were dry I painted the surface with acrylic paints. The colours were determined by having to try and use up some of the Alchemy paints which were now going off in spite of regularly adding water and mixing them. They do tend to dry out after a while although I have had them a few years now. Some of them have dried up altogether so I have ground them up and I mix them with some acrylic medium to use them for textured surfaces.

Anyway that is why it is the colour it is. I fingered some silver metallic paint over the raised design. The fabric was lined and stitched around the edges and a wrapped cord was made to fasten. The back is the same as the front.

Raised-acanthas-pad-folder-front

I will retake the photos of the others and blog them another time.

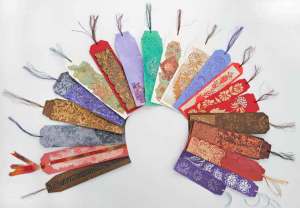
Yesterday I completed a batch of 20 bookmarks. They arose out of the need to use up off cuts of card which had accumulated from making the little folders and there was still more serendipity paper and samples to use and I did a little bit of experimenting too.

20-bookmarks

It was the first chance I had of trying out my purchase of Starburst stains. I also used some of the acetate stencils I made a while back and managed to use some of the stamp impressed Softsculpt from a couple of years ago. They took a lot longer to make than I envisaged as making decisions about how to do each one and how to use the bits etc took so long. In fact, making the decisions always takes longer than making and finishing them!!

Tomorrow I will start on the over painting of the printed images.

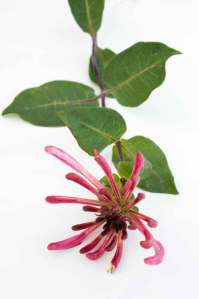
Earlier this year we tried to get rid of some honeysuckle which had become quite rampant in the garden. We thought we had removed it all but apparently not as there were flowers ready to open on the top of the hedge. I cut one to photgraph it as it was too high to reach and too windy to get a good shot.

Honeysuckle-1

I think it is much nicer to photograph when at this stage than fully open.

OK that's about it for tonight. Need to sort out the paints.

Cheers everyone.

Tuesday 21 July 2009

Book release

I couldn't resist posting the news that my book 'Embroidered Jewellery' has been released at last.


I received my copies from the distributor and see that it is now showing 'in stock' on the book retailer sites.

I will get back to my normal posts soon.
Cheers for now.

Sunday 12 July 2009

New for old

A fairly productive week as the weather hasn't been too brilliant in fact it is raining at this moment.
I have continued to use up some of the serendipity papers and sample bits of paper casts, heated tyvek and impressed clay.
I made some more pad folders similar to those of the last blog. As well as using up sample bits I also used recycled fabrics for the backgrounds.

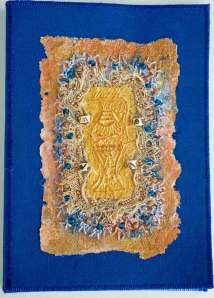
For this folder I used a paper cast - soluble paper over a rubber stamp, painted gold and the urn highlighted with red metallic wax. It was laid over some tea stained scrim over some dyed fibres over a piece of serendipity hand made paper. I used a variegated yarn in the colours of the serendipity paper and created a border of overlapping sorbello stitch to hold the fibres in place. Beads were stitched randomly among the stitches. Four large beads were stitched at the sides of the paper cast.

The background was a piece of recycled skirt fabric bonded to pelmet Vilene lined with mottled paper and edged with satin stitch. The serendipity paper was glued onto the background fabric.

Paper-urn-2

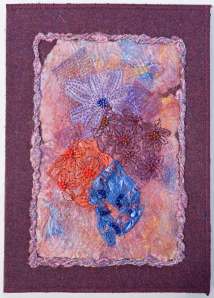
The next pad folder used up pieces of heated Tyvek impressed with flowers from a rubber stamp. I painted the flowers with metallic acrylic paint using colours in a piece of serendipity paper and arranged them onto that piece of serendipity paper backed with Vilene. Bits of metallic net were placed under the flowers which were then free machined in place and beaded. The background fabric was a piece of recycled trouser fabric. My OH had hated these trousers which were very trendy in the 70's because the fabric was very itchy. It has been in my fabric store for many years. I liked the colour so kept it and it was perfect for this particular piece.

The serendipity paper was glued onto the fabric which was then outlined with dyed twisted yarns couched down. The background fabric was mounted onto pelmet Vilene, lined with a plum paper and satin stitch edged.

Tyvek-folder

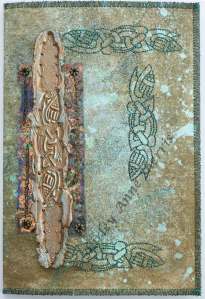
The next folder also used a piece of recycled trouser fabric. It was a piece of grey twill which I coated with gesso. I painted the gesso with a bronze metal paint. While it was still wet I spritzed some green patina fluid over the surface and then sprinkled some bronze patina embossing powder over it. I left it to react and dry then I used a heat gun to set the embossing powder. When it was dry I machined some digitised Celtic designs onto the surface using a variegated Madeira metallic thread which was similar to a green patina. Next I used some heated fusible film under a Celtic motif which was made by impressing a rubber stamp into some air drying clay then painting it with bronze paint and highlighting the surface with verdi gris metallic paint.

The fusible film was stitched in place using spacer beads and bits of couched chain from an old necklace. The clay motif was stitched in place with tiny bronze beads.

I glued a piece of dark green card to the inside of the folder and edged it with the patina coloured metallic thread. This folder turned out far far better than I had hoped for. I really like it and intend to play and experiment further with this surface technique.

Celtic-patination-folder-front

Continuing with my recycling theme -

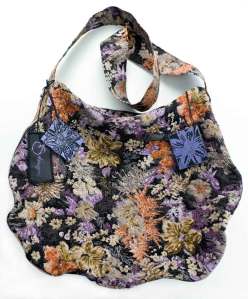
When I arrived home from my break I treat myself to some new skirts. I had to make space for them in the wardrobe so I cleared out old and no longer worn skirts and dresses. I cut up those which had fabric that was recyclable. It included one of my favourite dresses and so I decided to make something straight a way to use some of this fabric. I made a bag.

Floral-bag

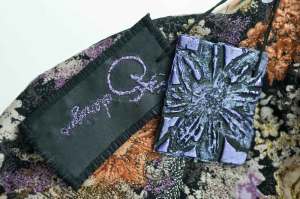
It is a large shoulder bag. The front and back panels are quilted using the floral design on the fabric. It has a zipper to close it and a wide reinforced strap. I made tags to hang from the strap and another tag for a zip pull. This turned out well too. I really like it.

Floral-bag-tags-

Now I am ready to begin some new pieces. I spent the day designing and making stencils from acetate sheets. I know I have a lot of stencils 'somewhere' but can't remember where to find them at the moment so now I have some more to add to them when I find them!!

We spent most of yesterday finding out that the wireless router was caput and borrowed another spare one from my daughter. It must have been breaking down for ages because our internet is so quick now without all the hiccups and the network to the back room computer also works now without slowing down. Wish we had blamed the router rather than the internet sooner. What a difference.

It is late now so it's off to bed.

Cheers everyone.

Wednesday 1 July 2009

Serendipity bits and pieces

For the last couple of weeks I have been using some of my serendipity papers and test sample bits and pieces.
I have created such a lot of these serendipity papers that it was time to use some of them and reduce the pile.
I also had a large collection of sample bits and pieces (model magic clay samples, heated tyvek samples, paper cast samples etc) which had built up over the last couple of years and needed using up so I sorted out all I had of both and began to see how I could create small pieces of mixed media from them.
This first piece used up a paper cast of an ammonite. I also used some of the left over dyed wool fibres. I made the textured creation into a padfolio using painted pelmet vilene as the base. I was able to incorporate a little bit of heated tyvek pressed onto a rubber stamp and some zapped acrylic felt with impressed model magic as a resist.

Beads and textured yarns were added and a twisted cord as a closer.

This close up shows more of the textures.
The next piece used up some model magic clay which had been impress onto a Celtic rubber stamp. It looked a bit like a shield broken into pieces so that is the theme I used. I painted the 'shield' with granite black metallic paint and then finger brushed silver metallic paint over the raised surface.
I used a piece of serendipity paper for the background and a piece of impressed tyvek painted black.
I used the Celtic stamp and stamped four of the design onto the paper which were then over stitched with black thread. Further hand stitching, beads and sequins were added.
I made some coils using silver wire and machined them in place with part of the design from the tyvek piece. A few bits of silver mesh were placed under the broken shield pieces. It was mounted on a piece of burgundy textured card - Broken Shield.

The next piece used up some samples of model magic clay spread onto Kunin felt which was then impressed with a rubber stamp and then left to set. It was then zapped with a heat gun. The clay acted as a resist.
I used another piece of serendipity paper as the background which also set the colour scheme for the piece.
I layered up the felt pieces on dyed fibres which were embellished with eyelash yarn, hand stitching and beads.
I wrapped three pipe cleaners with long haired yarn and couched them down the outsides and the centre of the piece.
Some large gold leaf beads completed the piece which was mounted on green card.


The next piece used a piece of serendipity paper cast which had been moulded over a plastic vent cover. I decided to cut the squared design into squares and create a design for a book cover. The squares were arranged onto brown velour (a recycled velour sweater from years ago) and outlined with metallic twisted cord. Beads were added to the squared surface.
It was made into a book using pelmet vilene lined with a bronze paper. I used a ribbon yarn to edge the book and make the wrap fastener.


The last piece for this blog used up some samples of model magic clay impressed with leaf rubber stamps and heated tyvek over the same rubber stamps. I also used another sample of the Kunin felt and clay resist. They were all painted with a green/gold metallic paint and highlighted with a Krylon gold pen. I simply put them into an arrangement and couched them down onto a piece of serendipity paper. This paper had been pressed onto a plastic net bag - the kind you buy oranges in - and so had the net design embedded into the surface. It was made into another little folder.

I am finishing off another two pieces but they will have to wait for the next blog.

As usual I have a couple of images from a walk we did a couple of days ago. I saw these wild roses in the hedge along the path up to Roseberry Topping - our highest local peak. We didn't climb to the top. We settled for half way.


On our way back along this same path we spotted this Painted Lady butterfly on the thistles.


I spent most of today working on more serendipity pieces but moved everything into the conservatory with all the windows open to make the most of the lovely weather. It was so nice to work while listening to the birds singing and the water fall in the pond. Hmmmmm.

Ok that's all for now.
Cheers everyone